Monday, June 24, 2013

Sourdough Banana Spice Bread

 Sourdough starter, once you've started a batch 'your committed'.....seriously I love working with sourdough starter.  There are so many things you can make with it.  Thanks to my friend Susan who gave me some of her starter I've become a bit 'obsessed' but my family (and friends) are enjoying it.
Today I thought I would bake with the two overripe bananas that I had sitting on my counter.  So out comes my starter from the fridge, gave it a good feed of flour and water and sat it on my counter to do it's magic.   A short while later it was bubbling and frothy and ready for me to have fun.
So with the bananas, starter, a few raisins, spices and of course some sort of nut, I decided to use sunflower seeds this time - I am off.  Hope you enjoy this recipe (and if you need starter, contact me) !

Sourdough Banana Spice Bread
 
The ingredients you will need.

My sourdough starter, bubbling and ready.

The finished bread ready for sampling with a friend or family.
 
SOURDOUGH BANANA SPICE BREAD RECIPE
 
 Ingredients:
1/2 cup butter or Coconut oil (I used Coconut Oil)
1 cup sugar
1 egg
1 cup Sourdough Starter
2 bananas, mashed
1 tsp Vanilla
2 cups flour
1 tsp cinnamon
1/2 tsp powdered ginger
1/4 tsp cloves ( opt)
1 tsp salt
1/2 tsp Baking Soda
1/2 cup raisins (soaked in hot water and drained)
1/2 cup toasted sunflower seeds
 
Cream together the butter or coconut oil, sugar, egg  and vanilla.
Mix in the sourdough starter and mashed bananas.
  In a separate bowl combine the flour, salt baking soda and spices.
Add the flour mixture to the banana mixture and mix just until combined.
Stir in raisins and sunflower seeds.
Do not over mix.
 Pour batter into a greased 9x5 loaf pan or two smaller loaf pans
Bake at 350 for 1 hour or until a toothpick inserted in the center of the
loaf comes out clean.  Cool completely before slicing.
 
 
"You will learn a lot about yourself if you stretch in the direction of goodness,
 of bigness, of kindness, of forgiveness, of emotional bravery.
Be a warrior for Love."
 
..........Cheryl Strayed


Saturday, June 22, 2013

Pyrohi - Baked Vegetable Tarts

 Vegetable Pyrohi
 
Comfort food when I was growing up.  My Mother and Grandmother, Aunts and Cousins all baked these vegetable filled,  yeast raised dough tarts.  They are served at many special occasions and any family meal.  They freeze well and reheat to a 'softness' that is like 'just made'.
 I decided to bake up a batch of these last week - I chose to fill them with sauerkraut, cottage cheese, carrot, pumpkin and a few apple/cinnamon and strawberry.  They are great as  'portable' lunches which take just minutes to reheat and topped with a bit of melted butter and sour cream with a green salad on the side - a perfect lunch, supper or snack.
 
 
Vegetable Pyrohi
 

Cottage Cheese, Romano Bean and Sauerkraut ready
to be stuffed into the pastry.

Eggs, salt are added to the dry cottage cheese.

The cottage cheese should stay together as above
 (when squeezed together in your hand)
   if it doesn't, add another egg.

This recipe called or 12 eggs, beaten

I shredded the carrots,

The carrots are 'dry fried' to remove excess moisture.

Pumpkin is 'cooked down' to remove excess moisture.
The pumpkin after it has cooked down and is much drier.
 
The yeast dough has risen and is ready to be rolled,
cut and filled.
  The dough is either rolled out with a rolling pin
or just pat it out to 1/4 inch thickness with your hands.

Cut rounds out with either cookie cutter or glass like I did.
You can choose the size you would like but don't make it too small.

Cutting the rounds out.
 
 All the dough has been rolled out and cut out

 Place your filled onto the round and proceed to fold
and close.

 You can see the folding in this photo

This video shows how the folding is done.

The tarts are all stuffed and ready to rise for an hour
then baked. 

Beautifully browned Pyrohi ready for sampling.

 Carrot and cottage cheese peeking out from the light
and pillowy dough.
 
 They are like jewels on a plate.....all that is needed
is a bit of melted butter, sour cream and a table filled
with family or friends to share this delicious food.
 
VEGETABLE PYROHI RECIPE
(this recipe is from the Hospitality - Cooking the Doukhobor Way Cookbook) 
(this is a large recipe but it can be cut in half )
2  1/2 cups milk
1/2 cup shortening
1/2 cup butter
4 Tbsp yeast
3/4 cup warm water
2 tsp sugar
1 dozen eggs
1 Tbsp salt
1/2 cup sugar
11 cups flour
 
Heat milk, shortening, and butter just until boiling point.  Cool.
Dissolve 2 tsp sugar and yeast in water.  Let stand 15 minutes.
Beat eggs, salt and 1/2 cup sugar.
Mix together with cooled milk.
Add flour to make a soft dough.
Let rise once.
When dough has risen ,   roll or press out dough onto counter ( 1/4 inch thick)
Depending on the size of your cutter, small size use approximately 2 Tbsp filling
  on the circle and spread slightly.
F old top of circle over filling and bring the edges towards the centre of the filling so
they are almost touching, fold bottom edge up.
Place on lightly greased cookie sheets, about 2 inches apart and let rise or about
45 minutes to 1 hour. 
Bake until lightly browned.
Serve with melted butter and sour cream.
 
FILLINGS
 
Cottage Cheese:  Squeeze as much liquid as you can from the dry cottage cheese ( I buy dry cottage cheese and then freeze it - defrost and squeeze out moisture) this helps the curds to break down into nice fine curds.   For 3 cups of cheese, use 2 large eggs, salt to taste.  Mix well.
 
Beans:  If using dry beans cook  (Romano/Italian/kidney)  until soft.  Drain and reserve some liquid.
Mash well, use some the the bean liquid  and some cream to make into spreadable consistency, add a pinch of sugar and salt to  taste.  I used canned beans, drained them and then cooked them dry in a frying pan to remove excess moisture.
 
Peas:  Use either split peas or frozen peas or a mixture of both.  Cook peas until tender, mash well, add salt and sugar to taste (sugar is optional). 
 
 Pumpkin: Put cooked pumpkin  into a frying pan, add 2 Tbsp of butter and cook until thick.  Add sugar or honey and a pinch of salt.
 
Beets:  Cook and peel beets.  Grate on fine grater, add a bit of butter and salt to taste. 
Saute or a few minutes.
 
Sauerkraut:   Drain sauerkraut very well, shred and saute lightly to remove excess moisture.
 
Potato:  Peel and boil potatoes in salted water.  Drain and mash well, add egg to make a soft filling.  Add some black pepper, minced garlic or sauteed onion.
 
 
"Kind words can be  short and easy to speak,
 but their echoes are truly endless"........Mother Teresa


Saturday, June 8, 2013

ROSE PETAL JELLY & THE MAGIC OF ROSES


Roses, so fragrant - so many varieties, so many colours.   This year my roses are blooming early and have so many buds and blooms, as I walk around my yard I stop and 'smell the roses'.   Rugosa roses I can smell from my deck, looking at one of my rose bushes heavy with roses I thought I might cook something with them.  Rose Petal Jelly is the idea that came to me!   Thanks to my neighbor and friend Anne and her 'donations' of several cuttings from her Rugosa Roses I have many plants to pick from. 
Thank you Mom for the lovely hand crocheted table runner that my pretty Rose Petal Jelly & Syrup are sitting on......
My first attempt at the Rose Petal Jelly/Jam was not a success but my Grandmother's voice in my mind of  'do not be wasteful' became my Rose Petal Syrup, perfect I realized for pancakes, waffles and even tea -   my second attempt - a successful Jelly....oh the joys of experimentation.

 Rose Petal Jelly & Syrup
ROSE PETAL JELLY  RECIPE
Yield 6 half pints
6 cups rose petals (either Rugosa or Wild rose)
4 cups water
1 box pectin
2 Tablespoons lemon juice
5 1/2 cups sugar
In large saucepan add the rose petals and water and simmer for 15 minutes.
Strain and return to pan. 
Whisk in pectin and lemon juice.
Add sugar and stir.
Bring to a boil, boil hard 1 minutes .
Pour into sterilized jars, seal and process in a
water bath for 10 minutes


Our life is an apprenticeship to the truth that around every circle another can be drawn;
that there is no end in nature, but every ending is a beginning.
Ralph Waldo Emerson


Wednesday, May 22, 2013

HERB & 3 CHEESE ROLLS


 Vacations, we all need them from time to time.  Our family just came back from Maui, HI where we attended the wedding of my Husband's niece Megan and her fiance Adri.  Wishing Megan and Adri the very  best in their new life together.
 This was the first 'family' vacation out of the country since my youngest was 5 (he is now 25).  We were all very excited to travel together and after a few delays arriving in Maui to sunny skies and warm temperatures.
Now that we are back home it's time to start creating.

Herb & 3 Cheese Rolls

The ingredients you will need.

The dough has risen and I've rolled it out and oiled with 
a bit of olive oil.

All three cheeses  (feta, old cheddar and Parmesan) have been
 sprinkled on the oiled dough and herbs have been added.

Cutting the rolls into 2 inch slices.

Rolls are placed on some parchment paper lined cookie sheets.
Let these rise for 30 minutes 

The rolls have risen nicely.
  The oven is set to 400 and then I turned it  up to 425 for the last 10 minutes.


 Freshly baked  Herb and 3 Cheese Rolls right out of the oven.


 Herb & 3 Cheese Rolls Recipe

For the dough, you can use your favorite bread or roll recipe. 
 I used Mom's Bread recipe found in this blog (December, 2012)  
  I  used a third of the bread dough recipe ( approximate) and used a rolling pin to form a rectangle.
Grate your cheeses, I used old cheddar, Parmesan and Feta cheeses.  Rub some olive oil on the rolled out bread dough and sprinkle the dough with your cheeses, then top with herbs of your choice.  I used my home grown dried oregano and basil as well as some granulated garlic.  On half of the dough I sprinkled chopped black olives (had some in the fridge from pizza night).  Roll the dough 'jellyroll style' seal the ends and slice into 2 inch pieces and arrange on a parchment  lined cookie sheet at least 2 inches apart. 
Let rise for 30 more minutes.  Turn oven to 400. When  rolls have doubled in size put them in the middle rack of your oven and  bake for 20-25 minutes, until golden.
Serve with a  bowl of  soup or just as a snack or with a salad.


'To be rich, is not what you have in your bank account,
but what you have in your 'HEART'....

Tuesday, April 30, 2013

Tangy Potato Salad

Picnics, when I hear the word I picture warm summer sun, green grass and either a lake, river or a creek near our spot.   This brings to mind  many family outings while growing up and while raising my own family.  Growing up, one of the highlights of the picnic season was the Annual USCC May Festival that takes place every year on the May long weekend in Brilliant, BC.  A weekend filled with song, skits that make you laugh, this is usually on the program for Saturday night of the Festival.  A gathering place for family and friends both young and old.  A time to catch up on happenings over winter and a time to welcome new additions and also the new engagements of young couples.   Each year on the Sunday after prayer service there is a picnic.  Every family packs their own and then joins with another family, sometimes two or three.  Blankets spread along the grass near the hall,like a patchwork quilt... with the Columbia River running fast in the background....I am gently transported  back....smiling, feeling the love deep in my soul.
 Good luck to all participants of the 2013 May Festival, I know there will be lots of singing, laughter, hugs and so many memories made.

I remember those days, there would be sandwiches made from homemade bread, salads such as a Potato Salad, fresh vegetables, sauerkraut, pickled beans and much, much more.  Oh such fond memories.  It has been too many years since I've attended the May Festival but I live through the memories that are so vivid in my mind.

Raising my family in different parts of British Columbia, one of our favorite things to do was to go on a hike/walk in whichever community we lived in at the time.  Of course a picnic was always a must  whenever we were out and about.  This recipe I came across while 'surfing' the Internet, I can't remember who the author is but she was German and this was a variation of her Mother's recipe.  It is vegetarian, and is becoming my family's favorite picnic Potato Salad  even though  the picnic may be happening during lunch time at their respective jobs.  I hope  you enjoy this as much as we do.

 
TANGY POTATO SALAD


Mmmmmm, so good.
 

The ingredients you will need.

I like to leave the peel on my potatoes ( for the added fibre)
and taste.  Potatoes  sliced and ready.

The onion is minced.

 A nice bunch of parsley from my garden is minced
and so fragrant.

 Freshly picked chives from my herb garden, ready for slicing.

Mayonnaise, yogurt, granulated garlic and freshly ground pepper.

Parsley and chives are mixed into the mayonnaise and garlic mixture.
The dressing is ready.

 Potatoes have been cooked, wine vinegar added along with
the rest of the ingredients.  The potatoes have sat for the last 10 minutes.
 
 Potatoes are drained and ready to be dressed!

Add the dressing and stir gently.  Your salad is ready to be sampled.

 
Tangy Potato Salad, eaten at room temperature or cold.
 
TANGY POTATO SALAD RECIPE
 
Ingredients:
1 1/2 lbs of potatoes (approx 5-6 medium)
2 vegetable bullion cubes
1/2 tsp salt
1 medium onion, chopped fine
bunch of parsley, flat leaf or curly, chopped
1/4 cup white wine vinegar
2 Tbsp sugar
4 Tbsp mayonnaise
1-2 Tbsp yogurt
1/2 tsp sugar
1/4 tsp garlic salt
pepper
chives
Directions:
Peel (I leave the skins on if the potatoes are nice),
wash and slice your potatoes into 1/4 inch slices
Cut the slices in 1/2 again.
In a large pot, add 2 vegetable bullion cubes, potatoes,
 1/2 tsp salt and pour in water until your potato slices are fully submerged
Finely mince 1 medium onion, set aside.
Wash, dry and finely chop a good handful of parsley.
 You can also add chives or even diced herbs.
In a measuring cup add 1/4 cup of wine vinegar, t Tbsp sugar, stir and set aside.
Bring the potatoes to a boil and simmer for 3 minutes - no longer!.
 Stick to this timeline or your potatoes will be too mushy.
Add the minced onion and the white wine vinegar/mixture.
  Bring the potatoes back to a boil and simmer another 3 minutes - no longer!
Turn off the heat and let the potatoes sit in the above mixture for 10 minutes
while you prepare the dressing.
Dressing:
Combine 4 Tbsp of mayonnaise (I use light),
 with 1 Tbsp of yogurt, 1/2 tsp sugar, pepper to taste
and 1/4 tsp garlic salt or granulated garlic.
Stir in the parsley, chives and any herbs you would like to use.
Drain the potatoes well and stir in the dressing. Taste to see if more salt is needed and adjust.
This salad can be eaten cold or at room temperature. I prefer it at room temperature.
 
Life has a way of shining on people,
who stand in the sunshine of kind actions.
Bryant McGill


Friday, April 26, 2013

PAM'S MEXICAN TORTILLA BUNDLES

    Our family loves to eat  Mexican food and I love to cook it because it's fast and easy. 
We love to eat these bundles on the weekend, I make them up and any leftovers I wrap and freeze.  They make perfect lunches, all you need to do is reheat either in a pan (or microwave if you prefer) just  until it's heated through.  They are perfect packages to eat on a picnic because they can be eaten held in your hand, dipped in salsa or with all the toppings I show you below, eaten with a knife and fork - great for company.   Hearty and spicy ( if you like) served with fresh shredded lettuce, tomatoes a bit of onion, topped with a salsa of your choice and of course home made guacamole and sour cream. The nice thing with a recipe like this is you can change it up by adding sliced olives or different toppings that your family prefers.  This recipe is great because you can make the bundles
up ahead of time and keep in the fridge, cooking them up in minutes.  A great make ahead meal that is filling and will please many tastes.
 
 
Pam's Mexican Tortilla Bundles
 
Delicious!
 
 Ingredients you will need for the meatless filling
sliced and ready to be sauteed.

 
Add some oil and then the sliced vegetables,. 
Saute the onions and red pepper for 2 minutes.

Add in the sliced mushrooms.

 Everything read to be tossed together for another 2-3 minutes. 

 Looking nice and ready, seasoned with some salt, pepper
and maybe some taco seasoning.

 I added meatless 'ground round' together with
the re-fried bean for a heartier filling.

  Bean and ground round mixture heated through and ready
 for the tortilla.

Ingredients waiting to be assembled into Bundles.

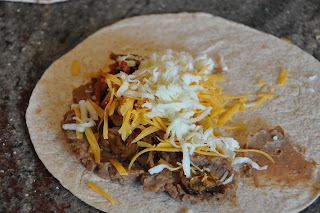
 Wholewheat tortilla, re-fried beans mixture topped with
the mushroom, red pepper and onion saute.
 

 Topped with your favorite cheeses and some pickled
or fresh jalapenos (for those who like some heat).
 

This is for those who like it a bit on the mild side...no jalapenos!

Fold into bundles, ready for the pan. Butter slightly
on each side.

 Browned, and heated through ready to be put on a plate
and topped with fresh and tasty toppings!


Pam's Homemade  Guacamole


Fast and easy recipe.
 Keep the pit in the Guacamole as it stops it from going brown.
 
Ingredients you will need.

 Put everything in a bowl and mash with either a fork
or a potato masher.  Season to taste and set aside. 
 

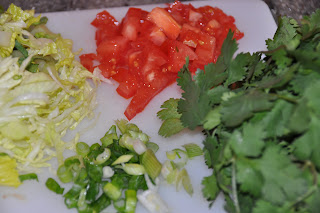
 Toppings for the Tortilla Bundles all set to go!

 Mmmm.....so delicious!


Pam's Mexican Tortilla Bundles Recipe
 
 6-8  Whole wheat tortillas
1-2 cups sliced mushrooms
1 onion, sliced
2-3 cloves garlic
1 sweet red pepper, sliced thinly
1 can re-fried beans
1 cup ground round
1-2 Tablespoons Taco Seasoning
salt and pepper to taste
 vegetable or sunflower oil
11/2 cups shredded cheese (your choice), shredded
soft butter
1 tomato chopped
2 cups lettuce, shredded
1-2 green or red onion sliced thinly
sour cream
salsa
Guacamole
 
In a saucepan add 1-2 Tablespoons of oil and add the onion, red pepper and garlic.
Saute until soft and then add the sliced mushrooms, saute 2-3 minutes more
and remove from heat.   Put in a small bowl and set aside.
In the saucepan add 1 teaspoon of oil and then the ground round,
saute until browned then add the re-fried beans and taco seasoning.
Heat through and set aside.
To Assemble Tortilla Bundles:
Lay out your whole wheat tortillas on the counter, top with a spoonful
or two of the re-fried beans - I usually make about 7 tortillas.
On top of the re-fried bean mixture, add spoonfuls of the red pepper and onion mixture.
Next add some shredded cheese and for those who like heat, the sliced jalapenos.
Fold short sides in then fold over the other two side (enclosing the filling)
Spread soft butter very thinly along each side - this will give it a nice browning and crispiness.
 In a frying pan, on medium heat place your buttered bundles and heat until  top and bottom sides are  browned.  You can check to see if the cheese is melting by lifting up one of the ends.
If your pan is too hot turn it down, and heat until the cheese is melted and the filling, heated through.
 
Place on a plate and top with the fresh lettuce, tomatoes, onions, sour cream, salsa and guacamole (see recipe below).
 
Pam's Quick Guacamole Recipe
 
1-2 medium ripe avocados
2- 3 cloves garlic, crushed
2 Tablespoons light mayonnaise
2-3 Tablespoons light sour cream
1/2 teaspoon salt
a few dashes of Tabasco sauce
juice of 1/2-1 lemon
 cilantro, chopped (optional)
tomatoes, chopped finely (optional)
 
In a small bowl, mash the avocados and add the rest of the ingredients.
Mix together, add more salt or lemon juice to taste.
  To this I sometimes add chopped tomatoes. My family like it this way
when snacking on Nachos.
 
 
There is a little bird in all our hearts that just likes to sing, for no reason. And as we allow it to sing, all others birds in the vicinity also begin to wake up and sing. And with all these songs a gentle sweetness permeates the air