Monday, May 4, 2015

Eatmore Bars.....love filled memories

Chocolate, nuts and a few other ingredients make for one of my Dad's favorite snacks.  My Father loved his chocolate bars, Eatmore and Oh Henry were two of his favorites.  I have been making this recipe for many, many years as it is also one of my favorite sweet treats.  I grew up with my Father growing many different vegetables, fruits and of course nuts! One year he grew peanuts and I can still remember the day when he took us to the garden with him to watch him harvest the patch of peanuts.
How surprised my sisters and I were to find out that peanuts grow underground - just like potatoes!
Father pulled up the peanut plant and there hanging on by their 'roots' were many many peanuts. He washed them off and then we had to wait until they dried and were roasted in the oven.  What a wonderful lesson we learned that day.  My Father was an amazing gardener, there was nothing he wouldn't try to plant.....'just to see' how it grew.  This I carry on with me and today I planted peanuts 'Valencia' variety in my Father's memory. I also made Eatmore bars (from store bought peanuts) to 'share' with Dad while I drank my tea.  Make some up for your family, no oven required.  They freeze beautifully and are great to share with family and friends.  Thank you Dad for all the lessons you taught us, for all the laughter you shared with us - for so many wonderful memories.
 EATMORE BARS 


The ingredients you will need.

The 'sauce' is melted together on the stove.

The dry ingredients combined waiting for the 'sauce'

 All the ingredients are mixed together waiting for the pan
 

Everything is pressed into the pan....now the waiting begins.
 
A delicious treat, this can also be dipped in melted chocolate for an extra special treat.
 
EATMORE BARS RECIPE
 
2 cups chocolate chips
1 cup corn syrup
1/2 cup peanut butter (I like the chunky kind)
1 cup oatmeal (quick cook or old fashioned - or half and half)
1 cup toasted unsweetened coconut
2 cups (generous) peanuts, chopped (I leave some whole)
 
Grease a 9x13 inch pan and set aside.
In a medium saucepan, melt the first 3 ingredients on low
until everything has melted and is a smooth texture.
In a large bowl combine the oats, peanuts and coconut then pour
the chocolate mixture over the oat mixture and stir until well mixed.
Press into the greased pan, cover and refrigerate until firm.
Cut into bars, logs or whatever shape and size you prefer.
This is where I sometimes dip them into melted chocolate and roll into
more finely chopped peanuts. Let cool and enjoy!
If there is a peanut allergy in the family change the peanut butter to another nut butter
and the peanuts to other 'nuts' and everyone is happy.
 
'Treat your parents with loving care....
For you will only know their value, when you see their empty chair....'


Friday, April 17, 2015

Ruby Red Rhubarb Squares

Spring brings 'new', new growth, new blossoms,  new life.  While in my garden last week I saw that the rhubarb had 'woken up' from it's winter sleep and was already nice and lush and ready for harvesting.  Last week I baked up a Rhubarb Coffee Cake.....mmmmm it was delicious.  So good in fact that I did not have time to take any photos!  Today I made some Ruby Red Rhubarb Squares.
Simple, quick and so very tasty.....this will be my husband's 'birthday treat'.This is my favorite time of year with everything awake and growing.  I remember many times running out to my parent's garden and picking a rhubarb stalk from the very large, healthy plant and simply snacking on it right there in the garden!  Sweet, tart and so very juicy.  Today I am able to pick my rhubarb from the very plant that my parent's had in their garden.....  The legacy grows on.
Thank you Mom and Dad.
 Ruby Red Rhubarb Squares
 

 The ingredients you will need for the topping, plus the toasted coconut.

 The ingredients you will need for the squares.

 The dough for the base is mixed and pressed into the pan.
The fruit mixture is spread over the base.

 The topping is mixed and ready for spreading.

 Ready for the oven.

40 minutes later.....mmmmm

A dessert that is perfect for the Birthday Boy!
 
 
Ruby Red Rhubarb Squares Recipe
 
2 cups diced rhubarb (preferably fresh but can use frozen)
1 cup raspberries (I used frozen)
 1 (3oz.) pkg. raspberry flavored jello
 1 cup all-purpose flour
 2 tablespoons sugar
 2 teaspoons baking powder
 1/2 teaspoon salt
 1/4 cup coconut butter/oil
 1/4 cup milk
 1 egg, beaten
 1/2 cup sugar
 1/2 cup all-purpose flour
 1/4 cup butter
 1/4 cup coconut, toasted
 
Combine rhubarb and raspberries and raspberry gelatin;  mix well, and set aside.
Combine flour through salt: cut in coconut butter until mixture resembles coarse crumbs.
 Add milk and egg, mixing until smooth.
 Press mixture evenly into bottom and 3/4 inch up sides of a greased and floured
 9-inch square baking pan, using the back of a floured spoon.
 Spread rhubarb mixture evenly over top, and set aside.
 Combine 1/2 cup sugar and 1/2 cup flour; cut in butter until mixture is crumbly, mix in coconut.
Sprinkle over rhubarb mixture; bake at 375 degrees for 35 to 40 minutes. Cut into squares.
Enjoy with some whipped cream or whipped coconut cream or vanilla icecream.
 
'Today while planting seeds I was thinking about how we all started as seeds.
We are not so different from each other.
Maybe you're a broccoli and I'm a carrot but we all share
this garden called.....Life.
Let's grow together because one day we'll all be compost anyway.'


Thursday, April 9, 2015

Kale and Bean Salad

Spring, it brings warmer temperatures, soft rains and new beginnings.
Last week I was out in the yard, wandering around the gardens, checking to see
what has sprouted since winter.  Checking on the plants still producing in the garden.
I came across some Lacinato Kale that I had planted last year and it was looking very healthy.
I picked off the leaves and washed and stored them in the fridge.
 Kale was introduced to me by my friends and wonderful gardeners, Marc and Susan,our family had not grown or eaten kale before. Growing up this vegetable was not a staple in my Mother and Father's garden so it was not familiar to me.
Since sampling some of Marc and Susan's kale I started to grow it and have had it in my garden for the last two years.  Today I made a salad adapting a recipe I saw on the internet by J. Pham.
This afternoon I sat out on my deck and enjoyed this delicious and healthy lunch with my two cats Klowee and Chelsea lounging nearby....the sun warming my bare toes and the birds singing their songs.....this is heaven, I am so very grateful.
 
 
Kale and Bean Salad

The ingredients you will need.

The dressing ingredients have been blended and poured over the beans and parsley.

 Adding the kale to the dressing and beans along with a sprinkle of feta cheese.
 

A beautiful and delicious salad....enjoy!


Bean and Kale Salad Recipe
Yields: 6 servings
1½ pounds fresh kale leaves
8 ounces gigante or corona beans, cooked and cooled (I used canned)
2 tablespoons store-bought julienned sun dried tomatoes, finely chopped
1 tablespoons mild honey
1 teaspoon salt
1 teaspoon Dijon mustard
juice of 1 lime
1 clove  garlic, finely minced
½ cup extra-virgin olive oil
3 tablespoons red wine vinegar
2 tablespoons parsley, finely chopped
½ teaspoon white pepper, freshly ground
1/4 cup feta cheese (optional)


Directions
Prepping the kale: Wash the raw kale thoroughly in several baths.
 Remove and discard any fibrous and older parts of the stems.  
For the bean dressing: In a mini blender (or a regular blender if you don't have a mini), combine the mustard, honey, lime juice, half a dozen  beans and  garlic. Thin the dressing with 2-3 tablespoons water. Blend until smooth. Season with salt and pepper. Add the extra-virgin olive oil and briefly pulse 2-3 times. 
Assembly:
In a large mixing bowl, combine the dressing, beans and sun-dried tomatoes. Let sit for at least 20 minutes. Add the kale. Massage and toss well until well coated.  
Sprinkle in feta cheese and toss. 
Serve at room temperature.
 
'Hate no one, no matter how much they've wronged you.
Live humbly, no matter how wealthy you become.
Think positively, no matter how hard life is.
Give much even if you've been given little.
Keep in touch with the ones who have forgotten you, and
forgive who has wronged you, and do not stop praying
for the best for those you love."


Friday, April 3, 2015

Happy Easter 2015

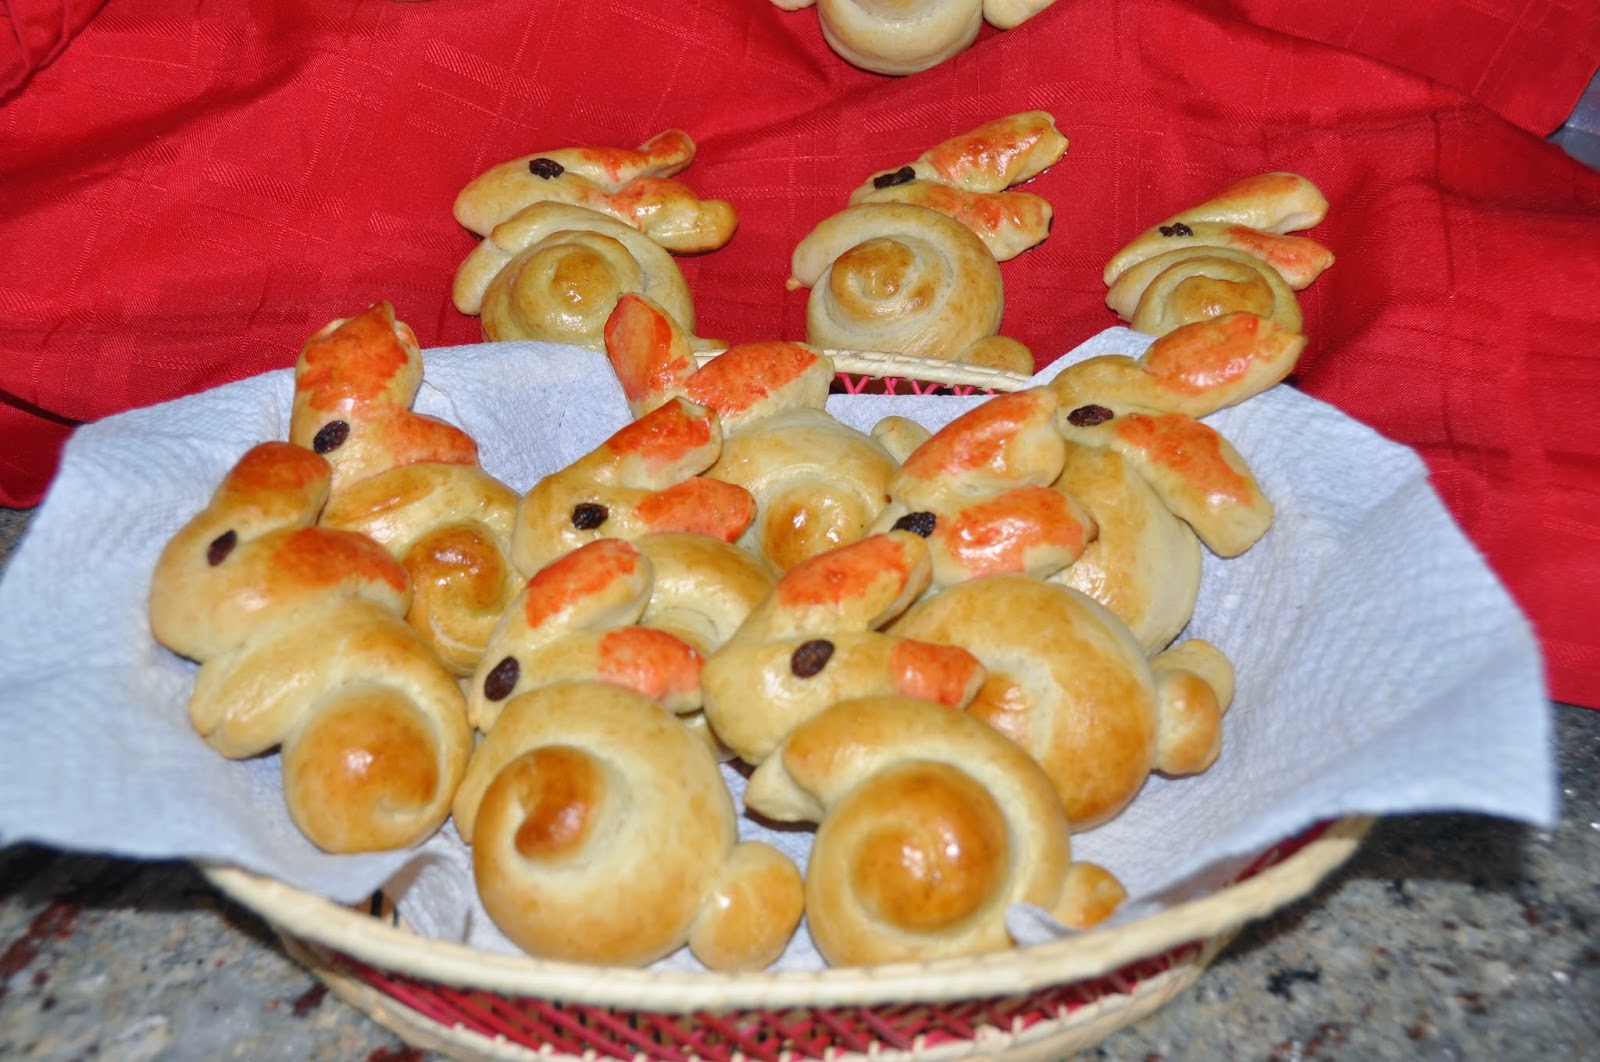
Easter Bunny Buns


When my children were young we spent a lot of time, colouring eggs, baking cookies with the Easter theme.  Now that they are grown  I miss these times we spent together.  Today I baked up a bunch of Easter Bunny Sweet Buns.....happy day in my kitchen.  I will be sharing them with a few of my elderly friends along my daily walk and with a few friends and of course my children.
Wishing everyone a Peaceful holiday weekend, good health and love to surround you every day.
Pam

Easter Bunny Buns Recipe


2 packages (1/4 ounce each) active dry yeast
1-1/2 teaspoons salt
1/2 cup milk
1/4 cup water
1/4 cup butter, cubed
2 eggs
raisins
1 egg yolks
1 to 2 drops red food coloring
Directions
In a large bowl, combine 2 cups flour, sugar, yeast and salt. In a small saucepan, heat milk, water and butter to 120°-130°. Add to dry ingredients; beat just until moistened. Beat in eggs until smooth.
 Stir in enough remaining flour to form a stiff dough.
Turn onto a floured surface; knead until smooth and elastic, about 6-8 minutes. Place in a greased bowl, turning once to grease top. Cover and let rise in a warm place until doubled, about 1 hour.
Preheat oven to 350°. Punch dough down. Turn onto a lightly floured surface; cut pieces of dough to
shape. I rolled one long roll for the body,(depending on how big a bunny you like) cut a smaller piece for the head and ears and one more small piece for the tail. Use a raisin for the eye, beat an egg yolk and brush over the whole bunny  and you can add a drop of red food colour to another egg yolk and brush on the ears.
Place on a greased pan.
Bake for approximately 20 minutes, until  nice golden brown.

 
'The body heals with play, the mind heals with laughter, and the Spirit heals with joy.'


Wednesday, March 25, 2015

Mom's 'Cherished' Cherry Squares.....made with love

Sisters Wendy, Pam, Holly....holding a pan of Mom's/Vera's Cherry Squares
in honour of our Mother.....with Love.
 
Friday March 13 we lost a very precious woman - our Mother Vera.
It was sudden but she was surrounded by her family when her time was near,
singing her favorite songs, this left a smile on her face.
Mothers, they are the brick that holds everything together, the one we call to ask for advice,
a recipe, when to start seedlings and so much more.
 
These Cherry Squares are very well known in the Castlegar and area.  Whenever there was a birthday, holiday or just a gathering of family or friends Mom would say 'I'll make Cherry Squares' and everyone would start to salivate at this ending to the meal.  She made them up in huge pans so everyone would have a piece. She made her very own Sour Cherry filling from the Sour Cherry trees that Mom and Dad grew in their garden. They would have been picked at their peak, pitted and frozen into bags for just this occasion.
 (oh and she made the best sour cherry pies and sour cherry tarts)
Mom didn't always use a recipe and somehow everything she made tasted perfect and that, I know, is because she put so much LOVE into everything she made and did.
She has left a hole in many people's lives but she did leave us with precious memories, good morals and lots of recipes. So each time I make one of her dishes, she will be right beside me in my kitchen and that will give my heart peace and a smile on my face.
 
 
MOM'S/VERA'S/BABA'S/TYOTA'S CHERRY SQUARES RECIPE
 
(The recipe below is for a large crowd but can be easily cut in half)
4 cups whipping cream
 2 blocks cream cheese, softened
 1 Tablespoon Vanilla
 2 Tablespoons Icing sugar
 1 box graham wafer crumbs
 2 Tablespoons Sugar
 1/8 cup melted Butter
 3 cans cherry pie filling ( Mom made homemade sour cherry pie filling)

 Mix the graham wafer crumbs, sugar and butter together.
 Set aside 1/4 cup of this mixture ( for topping).
 Press the rest of the crumb mixture into a large foil pan and bake at 350 for 10 minutes.
 Cool.  Beat cream until it is starting to thicken, add softened cream cheese by the Tablespoon, until all is incorporated, stir in 2 tablespoons icing sugar, 1 Tablespoon vanilla.

 Spread cream cheese mixture over cooled crumbs
 Pour the cherry pie filling over cream cheese layer and spread evenly.
 Sprinkle remaining crumb mixture evenly over the top
 Cover and refrigerate for several hours or overnight.


 'Food is a language of care, the thing we do when traditional language fails us,
when we don't know what to say, when there are no words to say'
Shauna Niequist


Wednesday, February 11, 2015

Kootenaigirl......one of my younger fans....and her cookie tester

 This is Natalie, one of Kootenaigirl's young food blog fans.
She is carefully measuring out the oil needed for a batch
of Coconut Raisin Cookies from my cookbook.
 

Natalie with her taste tester Mike! 
A chef in the making.....great job Natalie.

Monday, February 9, 2015

Eggplant Meatless Balls......serve for a snack or add to a Spaghetti Dinner

 Family, so precious.....gathering around the dinner table on a Sunday evening, a beautiful meal on the table and catching up on the events is a perfect way to end a busy week.
My family loves pasta and I am always thinking of ways to make it 'healthier and more filling'.
 Eggplant Meat(less) Balls are a great addition to the Spaghetti plate. 
 All that is needed is a crisp green salad and a piece of garlic toast made from homemade bread!
These Eggplant Meat(less) Balls are great for snacking on, served as an appetizer too!  I make up a horseradish/mayo dip, a tzatziki dip or even salsa to dip them in.   I encourage you to make up a batch of these, gather your family (or your friends) and just savour the flavours.....they freeze very well too!


  EGGPLANT MEAT(LESS) BALLS

 perfect for an appetizer or a Spaghetti Dinner...(see photo below)


The ingredients you will need. (I only have 1 egg pictured but you will need 4)

 First part of the recipe ready for a mash.

Add the grated Parmesan cheese.....looking good

The Eggplant is roasted and read, all that is needed is for the beautiful flesh to be scooped out. 
 The Roasted Eggplant is added to the rest of the ingredients.


 Final ingredient.....Panko breadcrumbs added and now ready to be shaped into balls.
These Eggplant Meat(less) balls are ready for the oven.  


Eggplant Meat(less) Balls Recipe
4 cups roasted eggplant (1 large)
2 cups breadcrumbs
1 1/2 cup hard boiled eggs, chopped
1 cup kidney beans (or beans of your choice)
1 cup grated Parmesan cheese
1 cup mozzerella cheese, shredded
1/2 cup chopped parsley
4 eggs, hardboiled
non stick cooking spray for pan
tomato sauce for eating
Wash the eggplant and pat dry. Cut the stem and end off your eggplant, and pierce five or six times to help release the steam and it bakes.  Place the eggplant on a baking sheet with foil or parchment paper on it and bake at 350 degrees for about 30 to 40 minutes. You know it is done when you can insert a fork or knife and it goes through the eggplant with no resistance.
(I like it a bit charred....adds a nice smoky flavour)
Once it is cooked, allow it to cool until you can handle it without burning your fingers.
. Scoop out the inside of the eggplant and discard the skins.
While the eggplant is cooling, you can prepare the ingredients to create the whole mix. Chop the parsley, Mozzarella. Cook the eggs and chop them as well. Combine all of these, including the Parmesan and breadcrumbs into a bowl with the prepared eggplant.
Add the four eggs and mix all the ingredients together, by hand is best, until very well combined. If the mixture is too wet to handle, and is sticking to your hands, add more breadcrumbs.
 Roll the mixture into balls, the size your family prefers. (I like them smaller than a golf ball size)
 It is easier to do if your hands are a bit damp.
Grease or spray with cooking spray a large baking sheet and place balls on sheet, continue until all filling is used up.  Bake at 375/400 degrees until nicely browned.
 You can freeze these meat(less) balls at this point. When you are ready to serve them, fresh or defrosted, put them into simmering tomato sauce for about 20 minutes to complete the cooking and allow them to soak in the flavour of the sauce. Serve on their own with Parmesan for sprinkling or with pasta, an nice addition of protein to your dinner.
These Eggplant Meat(less) Balls would make a delicious Meat(less) Ball Sub too!

Sunday Spaghetti & Meat(less) Dinner for my family.
Just add some garlic bread and perhaps a bit more cheese and enjoy!
Great comfort food and is very filling.
'For there are no ordinary moments. There are only precious feelings and memories we piece together one by one.  We call it a LIFETIME'
Leslie D Stuart