Thursday, September 18, 2014

Simple Vegetable Soup

Soup, comfort food that I remember eating at almost every meal while growing up.  Cool days are perfect for some hot soup and a simple Vegetable Soup made with vegetables from your very own garden - nothing is better than that.  This soup is just a base for what you can create, change up your vegetables,  add more or less tomatoes, if you like heat add some hot peppers it is so very versatile.
Growing up my Dad made homemade horseradish spread and this is must to eat with Simple Vegetable Soup along with a few tablespoons of dry cottage cheese...fresh homemade bread...
this sure brings back the memories!
It takes me back to my Mom and Dad's table, the smells, the laughter.....FAMILY
Enjoy.
 
 
Simple Vegetable Soup
 
Some of the ingredients you will need.

Butter melting

Onions, celery and carrots sauteeing in the butter, garlic will be added after

The tomatoes and quartered potatoes have been added 

corn will be added in the last 10 minutes (last minute decision)

Barley and steel cut oats are added and all will simmer for about 15 minutes
The corn, beans and diced potatoes are added in.

The quartered potatoes are removed
 

 Potatoes are mashed with the cream and butter, salt and pepper added


The mashed potato mixture is stirred into the pot and brought to a boil.
Soup is ready.
 
 
VEGETABLE SOUP RECIPE
 
1 medium onion, diced
1 carrot, diced
1 stalk celery, diced
2 cloves garlic, minced
2 cups tomatoes, fresh or canned (if using fresh, pulse in food processor)
4 medium potatoes, three quartered and one diced
1/2 - 1 cup chopped purple/green/yellow beans
1/2 cup corn, fresh or frozen
1/4 cup pearl barley
1/4 cup steel cut oats (Irish oats)
2 Tablespoons butter
1/4 cup whipping cream (or half and half if you prefer)
Salt, pepper to taste 

In a Dutch oven (or large pot) melt butter over medium heat, add diced onions, carrots and celery.
Saute until onion and vegetables are tender then add in the minced garlic. Saute for 2 minutes then add in the tomatoes, simmer for approximately 10 minutes then add the quartered potatoes and 6-7 cups of water. Bring to a boil then turn down heat and simmer until potatoes are tender enough to put a knife through them. Remove the potatoes to a bowl add  the cream and 1 Tablespoon of butter, salt and pepper, mash and set aside.
Add the barley and steel cut oats to the pot and simmer 15 minutes then add the beans, corn and diced potatoes. Simmer for another 10 minutes then stir in the mashed potato mixture.
Bring this to a boil and turn off heat. 
Soup is done!  I like to make this in the early afternoon and reheat for dinner.
I also pour some into jars and seal, storing them in the fridge until needed.


'Friendship consists in forgetting what one gives, and remembering what one receives.'
Dumas, The Younger


Friday, September 12, 2014

Rustic Beet Bread

We are getting closer to Fall (some communities faster than others) and with Fall come root vegetables. Beets are one of our families favorites, sweet, colourful and so nutritionally good for you.
We use beets in Borscht, sauerkraut, Vinegrette and other beet salads and dishes,
 today I baked bread with beets.
Thanks to my sister in law Ev Voykin for the challenge which inspired me to create this lovely, colourful loaf! I can see this on the table filled with homemade Cream of Mushroom soup, or a nice bit of colour on the buffet table.  A treat for a Valentine's Day lunch or any special occasion. Enjoy.
RUSTIC BEET BREAD

The beets and milk are blended together.

the blended beets and milk


Flour, yeast, salt, water, yeast and beet mixture all mixed together.

The dough has been kneaded and placed into my greased cast iron pan.

Bread dough after rising for 1 1/2 hours.

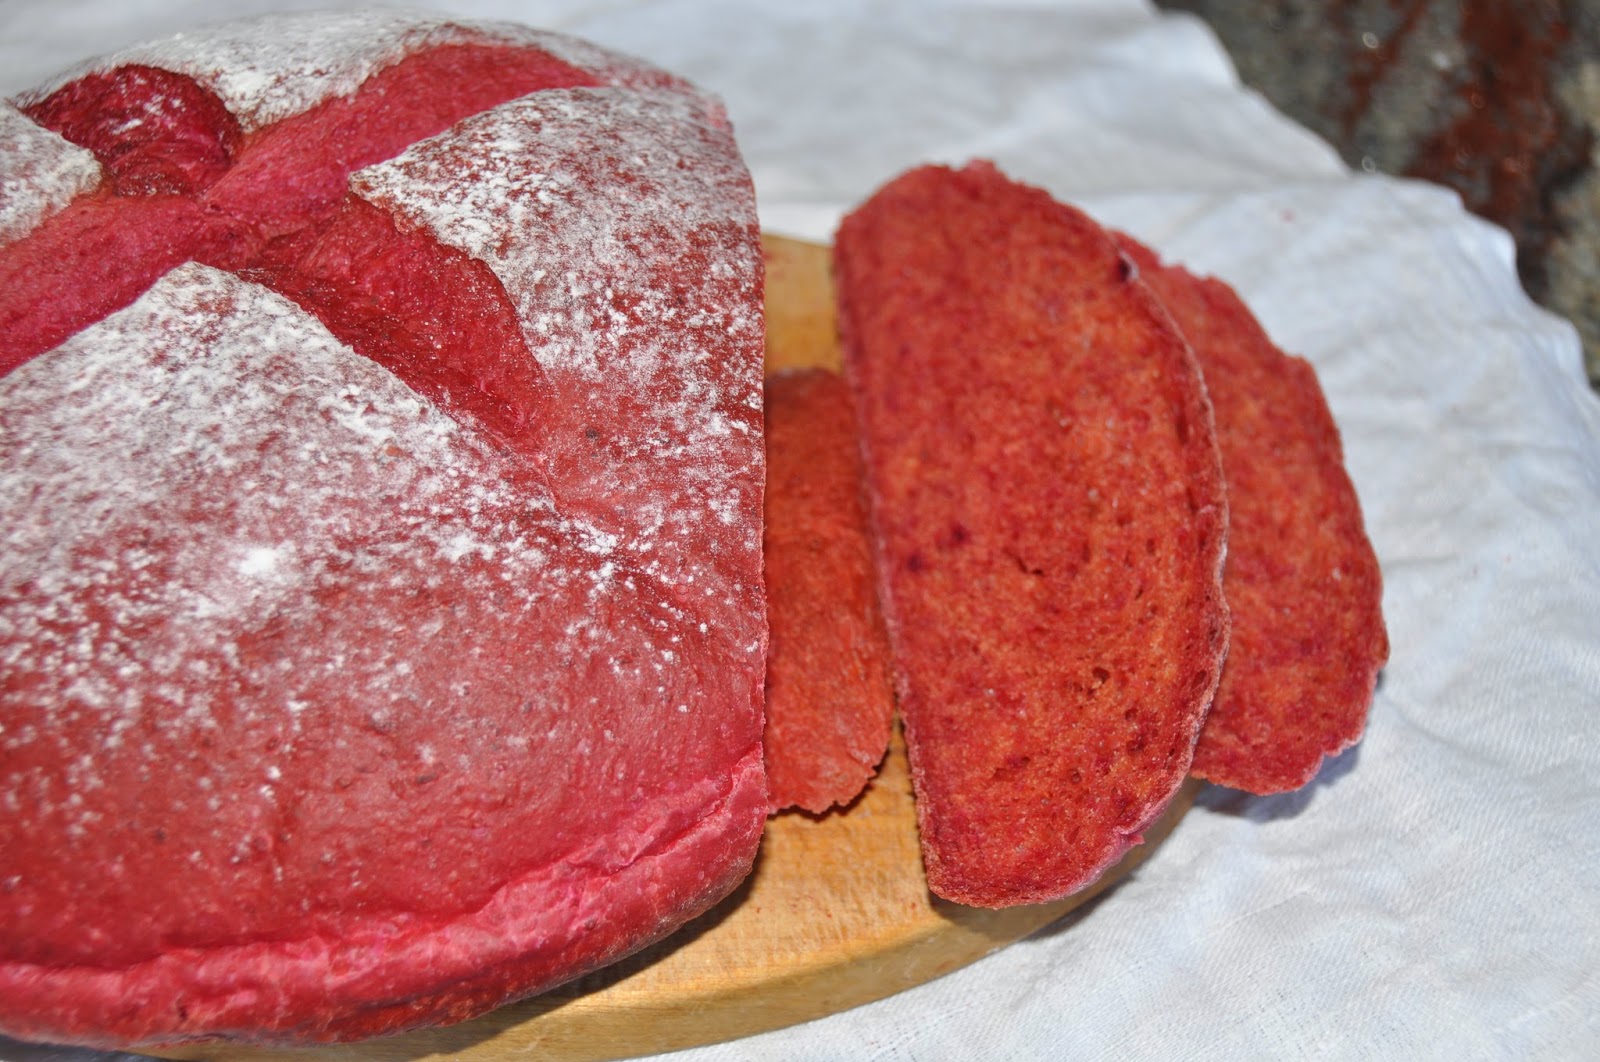
A lovely pink loaf fresh from the oven....


Rustic Beet bread sliced and ready for butter etc....such a lovely colour,
a nice light texture.......perfection.


RUSTIC BEET BREAD RECIPE

3/4 
cup warm water
1 1/2 
cups raw beet puree (about 2 1/2 peeled medium beets)*
3 1/2 
cups Gold Medal unbleached all-purpose flour
tablespoons olive oil
teaspoons salt
teaspoon sugar
2 1/4 
teaspoons active dry yeast

DIRECTIONS

*To make the beet puree -- peel 2 large beets or 3 medium beets (discarding or reserving 1/2 of one of the 3 beets, so you have 2 1/2 beets), and chop into 1/4-inch pieces. Puree in a food processor with 1/2 cup milk until mixture is smooth and free of lumps.

In a small bowl, combine yeast, sugar and water. Let rest 5 minutes.

In the bowl of a stand mixer fixed with the paddle attachment, combine flour and salt. Add in yeast mixture, beet puree and olive oil. Mix until just combined.

Knead, by hand or in a stand mixer fixed with the dough hook, about 10 minutes or until dough is smooth and elastic. Place dough in a lightly greased bowl, cover and let rise until doubled, about 1 to 1 1/2 hours.

Remove risen dough from bowl and shape into a round ball. Place dough on a baking stone or parchment paper-lined baking sheet and cover loosely with a lightly greased piece of plastic wrap. Let rise until doubled, about 45 minutes to 1 hour.

Preheat oven to 375 degrees F with an empty broiler pan placed on the rack beneath where you'll put the baking stone or sheet. Before baking the bread, sprinkle the top with a little flour and make an X shape on the top with a serrated knife.

Place the bread in the oven and pour 1 cup hot water into the broiler pan, closing the oven door immediately. Bake 30 to 35 minutes, or until a thermometer inserted in the bottom center of the loaf reads 190 degrees F.

Allow bread to cool completely on a cooling rack before slicing or serving.

 
'Most people are mirrors, reflection the moods and emotions of the times; few are windows, brining light to bear on the dark corners where troubles fester. The whole purpose of education is to turn mirrors into windows.'


Friday, September 5, 2014

Tomato Soup (Baba and Mom's way).....and something more.

On August 26, 2013 I entered a post on Canning Tomatoes.  Today I am adding to the process and making a batch of Tomato Soup - after the tomatoes have been cleaned, blanched, peeled, cored and put into jars.  The tomatoes peels and cores are sitting in a large puddle of tomato juice that ran from my fingers as I peeled and cut the tomatoes.  It would be such a waste to see this go to waste - my Mother and Baba/Grandmother taught me to use what you have and this is the result.....I took this one step further this year by reusing the skins once more by dehydrating them and grinding them into a powder to use later when seasoning soups, sauces or stews.  This year when/if you can tomatoes I hope you try this soup!  Na Zdarovye.

TOMATO SOUP (Baba and Mom's way)


 You will need the tomato peels, cores and excess juice collected from peeling tomatoes for canning.
You will also need onions, garlic and celery stalks.

To finish the tomato soup you will need to add the ingredients above.

Potatoes and celery diced and waiting for the soup pot.


Browned flour for thickening the soup.

The browned flour mixed with milk waiting to be added to the tomato broth.

The browned flour has been added along with the rest of the ingredients.
This Tomato Soup is so tangy, velvety smooth and so delicious!

TOMATO SOUP RECIPE

Peels, cores and juices collected from the blanched, peeled and cored tomatoes.
Put this all into a large pot, add any amount of celery stalk, onions, garlic - to taste.
For a Dutch Oven I usually add 2 onions, quartered
6 - 8 cloves garlic, whole
1 - 2 stalk celery cut in chunks
seasoning salt (optional)

Place all the ingredients into a pot and cover. Bring to a boil, and then turn
down heat to low.  Simmer on low for 4- 5 hours.  After 5 hours removed the tomato skins and flavouring and place into a cheese cloth (or new pantyhose) squeeze out as much juice as you can.
Set aside the peel mixture. (see recipe for these below).
Place the tomato 'broth/stock' into a Dutch Oven and bring to a boil, add in
1/4 cup pearl barley
salt, pepper to taste
1/4 cup spaghetti noodles, broken up to 1 inch lengths
Season with salt and pepper
Simmer for 15 minutes then add:
1 medium potato, diced
Stir in:  1/8 - 1/4 teaspoon baking soda (to keep milk from curdling when added)
Stir in 1 - 11/2 cups milk, 1% or whole, your choice
Bring to a simmer and stir in the Browned Flour* (see method below)
You will notice the Browned Flour will start to thicken the soup and give it a lovely smooth texture.
Bring this back to a simmer, and simmer for 5- 10 minutes.
Remove from stove, season with salt and pepper to taste.
Enjoy!

*Browned Flour
1 cup unbleached flour
Place flour onto a baking sheet and bake at 350 for approximately 10-12 minutes.
You want to see the flour with a nice light brown colour.
Remove from oven and place Browned Flour into a small bowl, break up any chunks and stir in milk to make a smooth runny mixture.
This will be used to thicken the soup and also because of the 'browning' of the flour you will be adding a lovely toasty flavour to your soup.


Taking the peels and flavorings once step further......
The peels and vegetables that have been squeezed of their juices and onto a pan for drying.
(these are the ones you have set aside in the cheesecloth/pantyhose)
Spread these peels out onto a parchment lined pan and bake at 175 degrees C until dry and crisp.
This may take several hours.  If you have a dehydrator you can dry the peels on that.
Once the peel mixture is dry, place in batches in a coffee/spice grinder and grind to a powder.


Yum!
 
The finished product.  Store in a jar in a cool spot.
Look and smells amazing, deep roasted tomatoes......perfect for adding to soups, sauces or stews -
to deepen the tomato flavour!  My Baba would be proud that there was no waste with this Tomato Canning Session of 2014!
'Our BREATH is a profound gift.  Breathe into your dreams.  Breathe through the difficult places.  Breath in JOY.  Just Breathe.'

Sunday, August 31, 2014

Simple Tomato Sauce (Italian Style)

August is a great month for tomatoes, many are ready for picking and eating and also processing.
My friend John owns a nursery/greenhouse, (Coastal Sun Greenhouses)
 and this year his tomato plants produced extremely well.
One of his clients ordered 50 plants of cherry tomatoes but decided not to take them and John decided he would grow them in his greenhouse and sell them at the local Farmers Market.  The tomatoes did so well that he was picking 30-50 pounds a day and not knowing what to do with them, he put them in 5 pound bags and froze them!  I bought a few bags (10) of these frozen tomatoes and decided to make some tomato sauce for winter eats.  My best friend Helena explained to me how the Italian community (her sister is married to an Italian) makes their tomato sauce. Thank you dear friend.  This is the basic process, I have added measurements as per my 'recipe'....delicious, simple, fragrant and a great way to use the tomatoes and the basil from my garden.   I do not peel the tomatoes as I like the added fibre of the peel but do use a hand blender to blend all ingredients for a beautifully smooth tomato sauce.  I add mushrooms, shredded cheese to this basic tomato sauce for pizza, lasagna, and even poaching eggs for a breakfast treat served over my sourdough English Muffins.....Yum!  I do hope you your try this wonderful tomato sauce.


ITALIAN STYLE TOMATO SAUCE

This sauce is perfect for some spaghetti noodles, a lasagne or even eggs poached in it for breakfast..
The ingredients you will need......tomatoes....either cherry or other varieties.

Garlic

 Fresh basil,  above,( olive oil, salt and red pepper flakes (not shown)

Combine all ingredients  (except tomato paste) in a large pot and bring to a simmer
  
One small can of tomato paste

All the ingredients are in the pot and are starting to cook.


The tomato sauce after it has been simmering for about an hour.

The tomato sauce after simmering 5 hours and after being blended.
The tomato paste is stirred in and simmered once again.


 The completed sauce, so thick and fragrant and ready for your dish of choice.

SIMPLE TOMATO SAUCE (Italian Style)
7 pounds tomatoes
1 head garlic, peeled
1 bunch fresh basil leaves (approximately 1 cup loosely packed)
1/4 - 1/3 cup extra virgin olive oil
1-2 Tablespoons salt
1 small can Tomato Paste
red pepper flakes (optional)
Place tomatoes (I used cherry tomatoes but if you are using larger tomatoes chop into quarters)
into a large pot, peeled whole garlic cloves, basil leaves, olive oil, salt (to taste) and red pepper flakes.  Bring to a boil at medium/low heat and then simmer gently for approximately 4-5 hours.
adding another 3-4 Tablespoons of olive oil half ways through. After the 5 hours stir in the tomato paste and bring back to a simmer, let simmer for another 10 minutes. Taste and adjust salt.
Using a hand blender, blend all ingredients together to make a smooth sauce.  Pour into sterilized jars and seal.  Process 12 - 15 minutes in water bath.  When cooking you can  add mushrooms, more vegetables or cheese for a little more protein.
This recipe makes approximately 18- 20 cups of sauce.
Enjoy.


'Place your hands into soil to feel grounded. Wade in water to feel emotionally healed. Fill your lungs with fresh air to feel mentally clear. Raise your face to the heat of the sun and connect with that fire to feel your own immense power.'

Thursday, August 21, 2014

Banana Lime Poppyseed Loaf

Yesterday was spent out in my gardens, cleaning up the spent blossoms.  Collecting the ripened poppy seeds from theirs proud spot on the stalk.  This gave me an idea for a baked treat to make for my daughter Anastasia and son-in-law Aras who are heading this way from Kamloops for a visit. (along with our Grandkitties, Grandbunny and newest addition the Grandpuppy).....aaah family.
I had a few bananas that were getting very ripe, freshly harvested poppy seeds and limes in the fridge....a perfect combination.  Hope you enjoy it too.
 
BANANA LIME POPPY SEED LOAF


 The ingredients you will need.
 
Wet and dry ingredients all prepared, bananas in lime juice ready for mashing.
 
 Banana Lime Poppy seed Loaf fresh from the oven.
Smells amazing!


You can see the chunks of bananas, flecks of lime zest and of course, sprinkle of poppy seeds.
Perfect with a cup of milk, tea or coffee.
Enjoy!
 
Banana Lime Poppy Seed Loaf Recipe

1/2 c. coconut oil
1/2 c. white sugar, granulated
1 1/2 c. all-purpose flour
1 tsp. baking powder
1/2 tsp. baking soda
1/4 tsp. salt

1/4 cup poppy seeds

1/2 tsp. ginger, dried, ground
2 large eggs
1/2 c. Greek yogurt
1 c. bananas, half-mashed (I used 3 small bananas to yield 1 cup.

What I mean by half-mashed is that the bananas should be mashed to a consistency that isn’t completely smooth and still retains some of the larger pieces of banana in it)
1/2 c. lime juice, freshly squeezed
2 tbsp. lime zest
Preheat the oven to 350°. Grease a 9″ x 5″ loaf pan and set aside.
Slice the bananas horizontally into disks and mash lightly with a fork. Immediately transfer to a small bowl and mix with the lime juice. Set aside.
In a small bowl, whisk the flour, baking powder, baking soda, salt and ginger together. Set aside.
Cream the sugar and coconut oil in a large bowl. Beat in the eggs one at a time, then the yogurt. Gradually beat in the dry ingredients, scraping down the sides of the bowl as necessary. Finish by folding in the banana mixture and the zest. Pour the batter into the prepared pan and bake for approximately 60 minutes. The finished loaf will be puffed and golden at the top, dark brown at the edges, and pulling away slightly from the sides of the pan. Note that this bread is incredibly moist and dense so the toothpick test will likely fail you. Simply bake to the full 60 minutes and be sure that the top of your bread is puffed and set and you’ll be fine. Remove the baked loaf and set aside to cool for at least 10 minutes before unmolding.
'The best kind of people are the ones that come into your life ,
and make you see the sun where you once saw clouds.
The people that believe in you so much, you start to believe in you too.
The people that love you simply for being You.'


Sunday, August 3, 2014

Zucchini Burgers......

Another long weekend with families and friends relaxing and enjoying these beautiful sunny and very warm days.  My husband and I sat on the deck last night enjoying the cooler evening and watching the boats and ships travel along Georgia Straight. The night was clear and we were able to watch the planes fly overhead and count the stars as they came out.  This warm weather also encourages many vegetables to produce....especially zucchini.  My Mom made Zucchini Burgers often when the zucchini was in season and as a 'younster' we chewed and swallowed 'grudgingly' but eventually started to enjoy the flavours; as an adult I crave these delicious burgers.Thank you Mom.....for making us eat our vegies|  This is an adaptation of my Mom's recipe.  They hold up well in a bun, they also freeze extremely well for those busy days when you don't have time to cook a healthy meal.

ZUCCHINI BURGERS


The ingredients you will need.

The vegetables are grated and seasonings as are the rest of the ingredients.

Everything is all mixed together.....I like to use my hands...

Shaped into balls.

Flattened into patties.....ready for baking in the oven.


Yum...just add your 'fixings' perhaps a slice of homemade pickle.....
ZUCCHINI BURGER RECIPE
3 cups zucchini, shredded
1/2 medium onion, grated
1 carrot, grated
1/2 green pepper, grated or diced finely
2-3 cloves garlic, grated or minced
6-8 mushrooms, grated or diced finely
1/4 cup Parmesan cheese (or cheese of your choice)
2 cups bread crumbs or soda cracker crumbs
4 Tablespoons flour (white or whole wheat)
1 teaspoon baking powder
3/4 teaspoon salt
1/4 teaspoon black pepper
2-3  Tablespoons Taco Seasoning
2-3 Tablespoons vegetable seasoning
red pepper flakes (optional)
2 Tablespoon olive oil
2 eggs

Preheat oven to 350 degrees.
Grate the zucchini and vegetables into a large bowl, add the seasonings and bread crumbs.
Add in the eggs and mix well until all ingredients are combined.
Shape into balls (you choose the size of burger you like)
Place onto greased baking sheet, lined with parchment paper.
Flatten balls into patties and bake for 20 - 30
You can flip patties over after 12 minutes to brown the other side.
Serve in bun of your choice or just as a patty on the side.
I like to serve mine in Sourdough Thins Buns and drizzle with some
of Antoinette's sauce/dip.
Enjoy.
*When freezing these patties layer wax paper in between for easier separation of burgers later.

'Love is the goal.......Life is the Journey'