Saturday, March 8, 2014

LAPSHA (Egg Noodles) made with love


Happy International Women's Day to all the women out there.  This is a post that I thought would be appropriate for today as it requires strength, determination and Women working together and teaching the next generation of Beautiful Women.

Making Lapsha is a day long affair and if you are lucky you will have family around to come over and help you.  I have so many good memories of making Lapsha, I can still hear the laughter, feel the heat of the stove and ovens and feel the workout that my muscles got from turning the handle of the pasta maker. (yes it was all done by hand with a 'manual pasta machine') a great upper body workout that is for sure!  I remember my Grandmother Polly, my Mother Vera and my sisters Wendy and Holly being a big part of making enough Lapsha to last for months (my brother Lawrence always seemed to be busy on these days) hmmm.  Mom first mixed up the dough with flour, fresh eggs from our chickens and butter from our cows and unbleached flour from the Doukhobor Flour Mill in Grand Forks, BC.   When we were young girls my Mom and Grandmother mixed the dough and cut it into pieces then one of my sisters was nominated to press each piece into flour and pass it to my other sister who would roll it through the pasta machine on the required 'first' setting.  She would then pass the pieces of dough to myself who would then press it into flour once again (this prevent the flour from sticking to the rollers/cutters of the pasta machine). (My sisters and I would change 'Lapsha' jobs' during the day long process so we did not get too tired during each step, this also taught us each step along the way).  Once the pieces were all 'floured' we moved on to the first setting (1) on the pasta rolling machine.  Once all the dough was put this this we moved onto 'second' setting (3) on the machine, which rolled the pasta a bit thinner and finally onto the 'third' step (the last point on the machine) of very thin sheets of pasta which we would hang on pieces of wood or wooden chairs covered in tea towels.  These sheets would then be taken by my Mother and she would 'cook' them on the surface of our wood stove until bubbles formed on one side and then they are turned and cooked until this side starts to bubble.  Then these are taken off the cooking surface and placed onto clean tea towels and covered until there is enough 'cooked' pasta sheets to begin the next step - this step is critical, the cooked sheets cannot cool down or they will be difficult to cut on the cutters of the pasta machine.  So while they are still warm from the stove top they are put into the pasta machine and cut and laid out onto baking sheets.  The final step is to bake these cut pasta sheets until they start to brown. This is where my Grandmother sat on a wooden chair near the oven watching so the pasta did not over bake.  I can still see her sitting on the chair in her homemade apron with a kerchief on her hair watching the cut noodles (and making sure we were all doing our jobs, nothing went passed her 'experienced eye'.  They are then taken out of the oven and left to cool and then finally put into bags for storage.  This all happens like a 'graceful dance' each step flows into another and before we know it - it's time for a break and lunch!  There is nothing like eating a piece of freshly baked pasta 'sheets' straight from the stove top and then dipped into melted butter................oh my mouth is watering as I write this.  So good.  After a break and lunch it was time to get back to the pasta dough and continue this process until it was all baked, cut and toasted.  Of course there was more sampling to be done and homemade jam was added to the freshly baked pasta sheets and then rolled up like a 'cigar' and quickly devoured and onto another.  It was always a full day, a lot of standing and walking and turning the handle of the pasta machine; but so worth the effort.  What a great way to spend time with Mother and Grandmother - we sang while we worked, we reminisced about the memories from previous days/months/years and we planned.
  We live away from immediate family and have for many years but when we crave  Lapsha I make up a batch all by myself but also 'with my Grandmother and Mother' by my side directing from her home if only in spirit.  Grandmother passed away many years ago but Mom is always there when I have a question about cooking and for that I am so very thankful,  she taught us so much.

Making Lapsha is a lot of work but you will be set for months, it makes a perfect meal if you are short on time and fills your stomach with such warmth and goodness.
I hope you try make a batch with family or friends.


Lapsha ready for any meal you choose. A labor of love.

The Lapsha dough has rested for about 20 minutes and is now ready to work with.


My 'work station' with the dough, flour, the pasta machine along
with a griddle for 'toasting' the pasta sheets and cookie sheets for the cut pasta
sheets that will go straight into the oven.


 All the Lapsha dough is cut, floured and now ready for the second setting
on the pasta machine.

Here is the Lapsha dough all set to be rolled on the second setting. 

Lapsha dough is now ready to be put through the third and final
rolling which will make it into the thin sheets of Lapsha ready for cutting.

Here you can see the Lapsha 'sheet'  it is ready to be placed on
a hot griddle (pancake griddle works well set at 350 degrees).
Wait until you see bubbles forming in the dough then flip and watch for
more bubbles to form. You can then take it and put it through the
cutters on the pasta machine or collect a few by placing the sheets into a clean
towel to keep warm.

The Lapsha (pasta dough) fresh off the griddle and into the cutters.
Spread the 'unbaked' pasta noodles thinly on a baking sheet.
Bake at 350 until slightly browned (5-8 minutes)

Lapsha nicely browned and smelling so good!

Here is some Lapsha that I cut into 'fettucini size' pieces.
The usually setting for the cutters is 'spaghetti sized'.

Finished Lapsha noodles ready to be put away for storage.
It feels so good to see all the work and effort sitting on the counter,
and knowing that this is the start to so many meals for my family.
 

Lapsha (Egg Noodles) stored in bags that I will keep
in a cool dry place.  You can also store it in jars too!


LAPSHA (EGG NOODLE) RECIPE

12 whole eggs, beaten
1 cup water
1 Tablespoon salt
 1/2 cup butter, melted
10 cups flour, approximate

In a large mixing bowl combine eggs, water, salt and melted butter.
Whisk until well combined.  Add flour a few cups at a time.
You can also knead in the flour until the dough is smooth - about 10 or 15 minutes.
  Set aside and let rest for about 20 minutes.
After the dough has rested, flour your counter and set aside some flour in a bowl.
Cut the dough into large 'golf ball' sized pieces and set aside.
Take each cut piece (both sides) and press firmly into a pile of flour, set aside.
Continue until all your dough is floured.
Repeat this step from step one through two on the pasta rollers.
Once all dough has been floured and rolled through the second setting on the pasta roller,
keep floured dough pieces covered with a tea towel so they do not dry up.
Set your pasta roller to the last mark/setting and continue to roll each piece into
thin sheets, you can stop after 4-5 sheets to start baking,
Set your griddle to 350 and bake each sheet until bubbles form then flip and do the same with
the other side.  DO NOT OVER BAKE as this will make it very difficult to cut.
 It's better to under bake the sheet of pasta dough as it will slide much easier through the cutters.
Working very quickly with the 'bubbled' sheets on the griddle, take each sheet and put
it through the cutters on the pasta machine. Place a cookie sheet under the cutters to collect the
cut pasta.  Once you have a thin layer of cut pasta, place into a 350 degree oven and bake for
5 - 10 minutes, until a light brown colour.  Remove from oven, let cool and store in a large container.
Lapsha is delicate so you do not want to overfill.
Once all your dough pieces are rolled, baked, cut and out of the oven you can then store your Lapsha
in plastic bags or jars.  Keep the Lapsha in a cool dark place and it will store for many months.
Enjoy!

My family's favorite way to eat Lapsha is to boil a few cups of water
add a teaspoon of salt and several tablespoons of butter, bring to a boil then
drop several 'handfuls' of the Lapsha noodles into the boiling water. 
Simmer for approximately 5 minutes.  (it will thicken up the longer it sits)
 Spoon into a bowl and simply enjoy!

Leftovers from this can then be made into Lapshevnik (Noodle 'Cake') - see recipe below.
which can be served with my Vegetarian Chili.


LAPSHEVNIK - Noodle Cake Recipe

2 cups homemade Lapsha Noodles (cooked)
6 eggs, beaten
4 cups sweet cream
1 teaspoon salt
2 Tablespoons butter, melted
1 1/2 teaspoon baking powder.

Preheat oven to 400 degrees.
In a large mixing bowl combine eggs, cream, salt, butter and baking powder.
Mix in the Lapsha Noodles, breaking up any clumps (for leftover Lapsha).
Pour into a 8 x 8 inch 'greased' pan and bake for 25 - 30 minutes until nicely browned
and the center is set.  Serve hot with melted butter.  This will feed 4-6 people very nicely.

*If using dry Lapsha Noodles, cook the noodles in salted water for 5 minutes, drain and
pour cold water over them to ensure they do not stick together.  Drain well again.
  If using leftover cooked Lapsha take out of the fridge about 15 minutes so they can warm up some, this will make it easier to separate them.
I have also substituted half and half for the cream.

My Grandmother and Mother also had a 'medicinal' recipe for when we got sick,
  I make it for my family when they are feeling 'under the weather'.

Lapsha 'Soup'
Bring one cup of water to a boil, add a pinch or two of salt, 1/4 - 1/2 teaspoon of butter.
Drop in 2-3 Tablespoons of finely diced potatoes and about 1/4 cup of Lapsha.
Simmer until potatoes are tender.  This sure works wonderfully if sick with the flu or cold
or if you don't have an appetite and need some nutrition.


'Your life is a message to the world.  Make sure it's inspiring.'

Tuesday, March 4, 2014

HEARTY VEGETARIAN CHILI....made easy...

It's now March and the weather is still so cool and wet, seems the perfect time for some comfort food.
Chili is another one our family's comfort foods -  so filling, warm and hearty.  This is what I chose to  cook up today along with some Whole Wheat San Fransisco Sourdough Bread.  This recipe for the Vegetarian Chili was passed along to me by my cousin Vera.  Many, many years ago she hosted a lunch at her place in Ootischenia and had a pot of this on the table.  I had asked her for the recipe and have been making it for the last 20+ years.  My family loves it and each time I make it I change it up a bit.  This recipe is an adaptation of Vera's that always hits the spot!  I sure miss those 'family' gatherings with all my Aunts, Cousins, and many more family members.  When our family would come down to the Kootenays for a summer visit or for a wedding, engagement party or sometimes a funeral, there would always be a gathering and a wonderful time for me to catch up on what has been happening in our family and extended family - as per tradition it is done around a beautifully set table - for breakfast - lunch or dinner.  There is always homemade pickled vegetables, both wild and from their gardens, baked breads or buns and of course a decadent dessert.  Most of all there is always so much loving energy, always great big hugs and sometimes tears that just happen to sneak out.....and the memories are always in my heart and will be there forever.  To my family and extended family in the Kootenays - thank you for all the love, support and inspiration you have given myself and my little family, it will always take me Home.


Vegetarian Chili...


The ingredients you will need.
  
The onions, celery and garlic are ready for the pot.
 Mushrooms are chopped and waiting to be added.

The onions, celery and garlic have sauteed and then the mushrooms are added.

The beans have been drained and rinsed and are waiting for the pot.

 A mixture of Chili Powder, Seasoned Salt, Cayenne and Cumin.

Spice mixture is added to the tomatoes, onion mixture. 

 The beans, corn and ketchup waiting to be added.
I also had some cooked quinoa in the freezer that I added.

So satisfying, fills the belly and warms you from the inside out!
Enjoy.

Vegetarian Chili Recipe

Yield: 5-6 quarts
2 tsp. vegetable/olive oil
2 medium/large onions, chopped
4 cloves garlic, minced
4 stalks celery chopped
2 cans sliced mushrooms (I use fresh or dried )
2 quarts canned tomatoes 
1 cup ketchup or BBQ sauce (or half & half)
2 540 ml cans of red kidney beans, drained and rinsed
2 540 ml cans of pinto, Romano or black beans, or chick peas,  drained and rinsed
2 540 ml cans (or equivalent of) beans in tomato sauce
1 1/2 Tablespoons chili powder
1 Tablespoon Cumin
1 1/2 teaspoon black pepper
1 teaspoon cayenne
1 Tablespoon Seasoning Salt
(a few drops of liquid smoke if you like a smokier Chili)
1 can of corn niblets, drained and rinsed (optional)
Quinoa (optional)

In a large stockpot saute the onions, garlic, celery for 3-5 minutes then add the chopped mushrooms and tomatoes.  Simmer for approximately 1 hour - until thickened.
Add the spices and stir in, simmer another minute more then add your beans, ketchup and salt (if needed).  Bring back to a simmer for about 15 minutes stirring constantly or the bottom with burn.
Scoop some Chili into a smaller pot for supper and pour the rest of it into jars and seal. 
 This will keep in the fridge until you are ready for it.  Just pour into a pot and reheat.
Serves with some fresh garlic bread sprinkled with the cheese of your choice.

'It's funny how in this journey of life, even though we may begin
at different times and places, our paths cross
with others so that we may share our love, compassion, observations, and hope.
This is a design of God that I appreciate and cherish.'
Dr. Steve Maraboli

Saturday, February 22, 2014

Quinoa & Bean Salad with Tomato Vinaigrette

We just returned from a very relaxing holiday and were craving some of our favorite 'Canadian Foods'.  Cuba is famous for their 'black beans and rice' dish (which I just happen to love) and their fruits are delicious.  Their tomatoes at this time of the year are juicy and very tasty as are their cucumbers, seeing as it's still Winter here in Canada it is always a nice treat to be able to eat ' vegetables' fresh from the garden.  Tropical fruits such as watermelon, honeydew, pineapple and strawberry papaya - so sweet and juicy and we enjoyed them every morning for breakfast.  This salad has been a favorite of ours for many years - I first saw the original recipe in a Canadian Living magazine and have since adapted it to our tastes, this is my version below.  Passata tomatoes you can find in most tomato sections at the supermarket (or just drain you own canned tomatoes and blend) and you can change the type of beans/peas etc to your tastes - I love to use basil and oregano but the original version uses Italian herb mixture.
  I hope you enjoy this salad as much as we do.  It is great to make when the green beans are fresh from your very own garden and makes a wonderful summer lunch. This recipe makes a very large portion and is perfect to take to a potluck or any large gathering.


Quinoa & Bean Salad with Tomato Dressing

The ingredients you will need.

The Quinoa is cooked, the vegetables are diced and ready for the bowl.
The Kalamata olives will be sliced.

All the ingredients are assembled into a large bowl.

Tomato Vinaigrette is ready to dress the salad.
  
This healthy and colorful salad can be served as a main course or a side.

Quinoa and Bean Salad with Tomato Vinaigrette Recipe

Makes 10 servings

Ingredients:
1 cup quinoa, rinsed
2 cups green beans, trimmed and chopped
1 can mixed beans, chickpeas (or beans of your choice)
1 small onion, diced
1 sweet red pepper, diced
1 cup feta cheese, crumbled
1/4 cup Kalamata olives, sliced

Tomato Vinaigrette:
1/3 cup bottled strained tomatoes, (passata)
3 Tablespoons red wine vinegar
3 Tablespoons olive oil
1 Tablespoon honey (can add up to 3 TBSP  if you like)
1/2 teaspoon dried basil
1 teaspoon dried oregano
1/2 teaspoon salt
1/4 teaspoon black pepper
pinch of cayenne

Method:
In saucepan, bring quinoa and 2 cups of water to a boil; reduce heat, cover and simmer for 12 minutes.  Fluff with fork and let cool.
Meanwhile, in a saucepan of boiling salted water, blanch green beans until tender-crisp, about 3 minutes.  Drain and refresh in bowl of ice water.  Drain and transfer to a large bowl.
Stir in the cooled quinoa, beans, onion, red pepper, feta cheese and olives.

Tomato Vinaigrette:  Whisk (or put into a small jar) together the tomatoes, vinegar, oil, honey, seasonings, salt, pepper and cayenne.  Pour over quinoa mixture and stir to coat.
It can served at room temperature or cold, add a nice crusty bread and you have a meal.

'The heart is like a garden.
It can grow compassion or fear, resentment or love.
What seeds will you plant there?
.....Buddha'

Monday, February 3, 2014

Mushroom and Olive Stuffed Cheese Bread

Family get togethers and snacks or just snacks for a weekday afternoon.  Something quick and tasty to take along on a picnic or just to enjoy with family while watching a movie; add this to a hot bowl of soup and you have a meal.   This Mushroom and Olive Stuffed Cheese Bread would be a great lunch to pack for the kids to take in their school lunch or the Husband/Wife to take to work.  I had come across a recipe for a Cheese Bread in the Food Network Magazine and added my own touches to it - I though the original recipe needed more 'substance' so I added finely minced mushrooms and black olives.  I also served this Cheese Bread with a small bowl of ' tomato dipping sauce', you can dip it into Ranch Dressing or something with a kick by adding some hot sauce to the tomato sauce - I think whatever your family likes!  Enjoy. 

Mushroom & Olive Stuffed Cheese Bread

The ingredients you will need.

The dough has been mixed together, kneaded and left to rise for 1 1/2 hours.

Beautifully risen dough ready for the stuffing.

First half of the dough rolled out and ready to be filled.
Mozzarella cheese, finely chopped mushrooms and olives,
for stuffing inside.

Fold the dough over the stuffing and seal the edges.

Cut into 1 inch strips 1/4 of the way through and sprinkle
with the cheddar cheese/herb mixture.  Place on some
parchment paper and it's ready for the oven.

Close up view of the cuts and sprinkled cheese topping.
  
Oh it's cheesy, gooey and so very good.
All that's needed is the dip.  Enjoy!

MUSHROOM & OLIVE STUFFED CHEESE BREAD RECIPE

For the Dough;
2 cups all purpose flour
2 1/4 teaspoons yeast (I like Bread Machine Yeast
because you can mix in right in with the dry ingredients)
2 Tablespoons olive oil
2 teaspoons sugar
3/4 cup warm water
 1/2 teaspoon salt
For the Filling;
1 1/2 cups shredded mozzarella cheese
1/2 cup shredded cheddar cheese
1/4 cup shredded Parmesan or pecorino Romano cheese
1 teaspoon garlic salt
1 teaspoon granulated garlic
1/2 cup mushrooms, chopped fine
1/4 cup sliced olives, chopped fine
1 teaspoon dried parsley and oregano

Make the dough:
Whisk the dry ingredients together, add the olive oil and water
and stir until it comes together, then put onto a floured counter and knead until smooth and elastic, about 5 minutes, dusting with flour as needed.  Put into a large oiled bowl, cover with plastic wrap and let rise for 1 1/2 hours or until doubled in size.

Make the filling:
Toss 1/2 cup shredded mozzarella, the cheddar and pecorino, garlic salt, granulated garlic and dried parsley and oregano in a bowl. In another bowl mix the rest of the mozzarella with the mushrooms and olives and set aside.  Preheat the oven to 450 degrees.
Line a cookie sheet with parchment paper and set aside.
Cut the dough into two pieces and roll our each piece into an 8 - 10 inch rectangle
Sprinkle half of the mushroom/olive/cheese mixture onto one side of the dough and
fold over and seal the edges well.  Do the same with the other piece of dough.
Take a sharp knife and cut slits 1/4 of the way through the dough - one inch width in between pieces -
Sprinkle the cheese and herb mixture on top of the cut and stuffed dough.
Place in hot oven and bake for 15 - 20 minutes until baked through and the cheese is golden brown.
Let cool slightly and then pull apart into 'breadsticks' or slice into pieces. 
'I would like to live the way the river flows: carried out by the surprise of it's own unfolding.'
John O'Donohue

Sunday, February 2, 2014

Barlely and Beans Salad

Salads are the perfect meal for lunch, a light supper or even as a snack in between meals.
This Barley and Beans Salad would travel well on a trip or to work.
Our family loves beans (and corn too!) so the combination of them both - Yum!
This salad is hearty and has a bit of a kick so colourful and very filling.
.  You can add the herb sand any bean combination  your family likes best .
 
 
Barley and Beans Salad
 
Colourful, healthy and quick to make.
 
 
The ingredients you will need for the salad.

The ingredients you will need for the dressing.

The barley has been cooked and cooled.

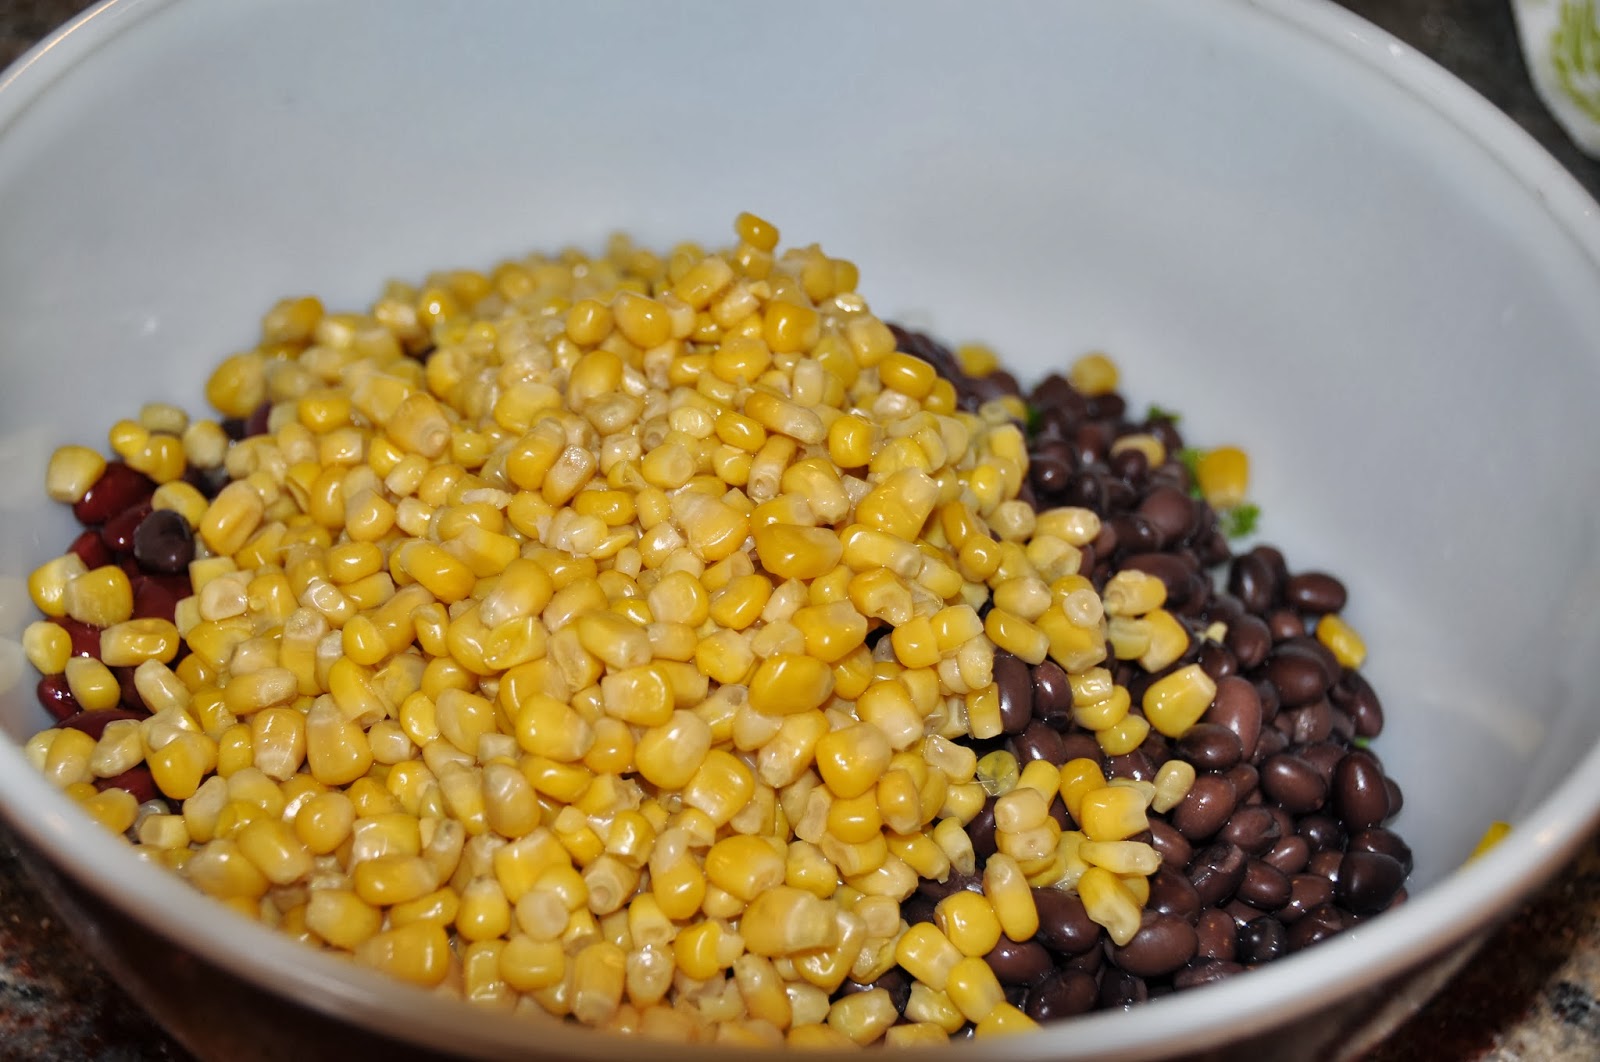
Kidney Beans, Black Beans, Corn and veggies have been added to a large bowl. 
All that is needed is the dressing and some tossing!


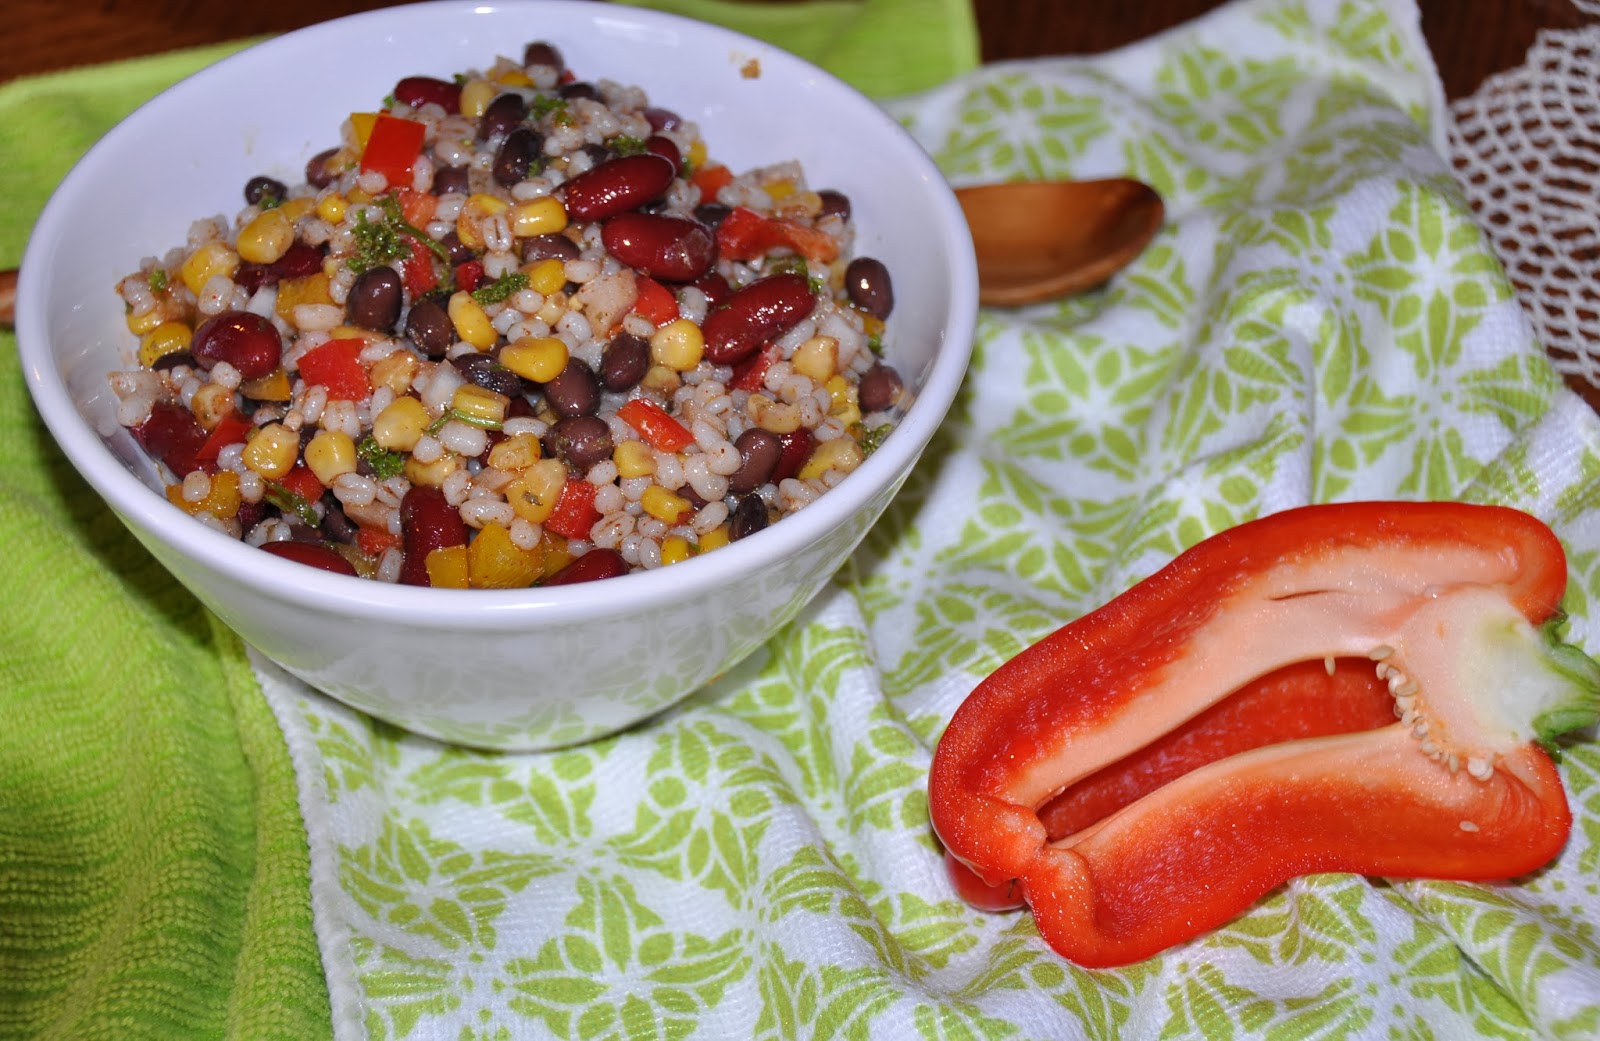
Beautiful, colourful and oh so tasty......Barley and Beans Salad.


BARLEY AND BEANS SALAD RECIPE
 
Ingredients
 
1 cup pearl barley
2 cups water
1 cup canned black beans, drained and rinsed
1 cup canned kidney beans, drained and rinsed
1  can corn kernels, drained and rinsed
1/2 cup red onions or sweet onion, diced
1 red bell pepper, diced
 
Dressing:
1/3 cup red wine vinegar
2-3 cloves garlic, minced
1 tsp chili powder
1 tsp dried parsley
1 tsp cumin
1/2 tsp kosher salt
1/2 tsp crushed red pepper flakes
1/4 tsp ground black pepper
1/4 cup olive oil
In a large saucepan, bring 2 cups water to boil.
 Stir in barley and reduce heat to medium-low.
Cover and simmer 30-40 minutes or until tender.
 If using a rice cooker, increase water to 2 1/2 cups. Allow barley to cool.
 In a large bowl, combine the cooled barley, beans, corn, red onion and bell pepper.
 Mix well.
Combine remaining ingredients, whisking in olive oil. Pour over salad and toss well.
Serve at room temperature or chill in fridge for several hours.
You may not need all of the dressing, use your discretion.
 If serving chilled, reserve some of the dressing to pour over salad just before serving.
 
'The human soul is to God is as the flower to the Sun;
 it opens at it's approach and shuts when it  withdraws.'
B. Whichaile


Wednesday, January 29, 2014

Greek Style Quinoa Black Bean Burger

Quite often when one thinks of having a Burger - it's usually fast food,
 and after eating it - not very satisfying at all.
  Well here is a healthier version for you, dress it up to your tastes,
 add some oven fries and a side salad and voila!
When you are hungry the thought of biting into a nice hearty burger is so enticing my family
can't wait to dig in.  I recently came across a recipe for a Quinoa Burger (Body & Soul) that
sounded delicious.  This is my adaptation of their recipe.  I had made some Sourdough Maneesh (pita pockets) the day before so this burger was perfect to stuff the pocket with.  I also made up some Avocado/Yogurt Dressing that I drizzled over the burger.   It was very filling, and so very satisfying.
 
 
Greek Style Quinoa Black Bean Burger


Greek Style Quinoa Black Bean Burger Recipe
 
 
 Yield Serves 5
Ingredients
1/2 cup rinsed quinoa
1 medium carrot, cut in large chunks
6 scallions, thinly sliced
2 cloves garlic
1 can (540 ml) black beans, drained and rinsed
1/4 cup soda cracker crumbs
1 large egg, lightly beaten
1 tablespoon ground cumin
1 teaspoon ground oregano
1/2 teaspoon ground basil
Coarse salt
Ground pepper
1/4 cup feta cheese, crumbled
pepperoncini peppers (chopped fine) optional
2 tablespoons olive oil

In a small saucepan, bring 3/4 cup water to a boil; add quinoa, cover and reduce heat to low.
Cook until liquid is absorbed, about 12-14 minutes; set aside.


In a food processor, pulse carrot and garlic cloves until finely chopped.
Add cooked quinoa, half the scallions, beans, cracker crumbs,
egg, cumin, oregano and basil, 1 teaspoon salt, and 1/4 teaspoon pepper;
pulse until combined but still slightly chunky. Fold in the feta cheese.
Form mixture into four 3/4-inch-thick patties (dip hands in water to prevent sticking).
If too soft, refrigerate 10 minutes to firm.
In a large nonstick skillet, heat oil over medium; cook burgers until browned and cooked through,
 8 to 10 minutes per side.
Serve on a bun, pita pocket or just as is along side some steamed veggies - top with cheese sauce or salsa.  Enjoy!

 
My Quinoa Black Bean Burger is served in a Sourdough Maneesh Pocket,
 topped with an Avocado/Yogurt  Dressing.
 
 
'Be gentle and compassionate with those around you.
 Mother Nature opens millions of flowers every day without forcing the buds.
 Let this be a reminder not to be forceful with those around you, but to simply give them enough light and love, and an opportunity to grow naturally.
Ultimately, how far you go in life depends on your willingness to be helpful to the young, respectful to the aged, tender with the hurt, supportive of the striving, and tolerant of those who are weaker or stronger than the majority.
 Because we wear many hats throughout the course of our lives, and at some point in your life you will have been all of these people.'


Sunday, January 19, 2014

Hamburgerless Soup

Soup is such a comfort food on a cool Winter day.  The idea for this soup came from a recipe my friend Anne shared with me.  She is a wonderful cook and shared a recipe for Hamburger Soup that she makes.  I adapted this recipe for a Vegetarian diet by substituting a hearty brown mushroom for the ground beef.  Mushrooms are full of nutrients including B Vitamins, Niacin, Riboflavin, Selenium, Copper, Potassium, Vitamin D, Protein and more.  I grew up foraging for wild mushrooms a great memory, great exercise and wonderful family times together.  Try this soup, the recipe makes a nice big pot and it freezes well, it gets better as it sits - great to have on hand on those busy days.
 
Hamburgerless Soup
 
The ingredients you will need.

The mushrooms and vegetables all diced finely, ready for browning.

The mushrooms and onions are browned before the rest of the ingredients are added.

All ingredients are in the stockpot and will be simmered for about 2 hours.


So rich and thick and hearty, add a slice of bread.  Serve with some cheese and you have a meal.
The mushrooms are meaty and full of vitamins and minerals and protein too.
Enjoy!
 
HAMBURGERLESS SOUP RECIPE
 
2 Tablespoons butter
3 Tablespoons oil
 4 cups of  finely chopped brown mushrooms (approximately 2 dozen brown mushrooms)
1 medium onion, chopped fine
1- 28 ounce can chopped tomatoes
2 cups water
1 carton (900 ml) vegetable broth
1 can  condensed tomato soup
3 carrots chopped, fine
3 stalk celery, chopped fine
1 bay leaf
2 cloves garlic, minced
1/2 teaspoon dried thyme
8 Tablespoons pearl barley
parsley, chopped fine
 
In a large stockpot sautè mushrooms in the butter and oil until mushrooms are browned.
Add onions and garlic and continue to sautè for 3 more minutes
.  Add the rest of the ingredients and simmer, covered for about 2 hours.
Remove the bay leaf.
Garnish with the freshly chopped parsley.
Enjoy.
 
Time decides who you meet in your life. Your Heart decides who you want in your life.
And Your Behavior decides who will stay in your life.