Sunday, September 22, 2013

Tomato Cobbler

Happy First Day of Fall from my family to yours......the temperature has cooled, the rains have started - the gardens are being put to rest and the winter vegetables are being planted (at least here on the West Coast of British Columbia).   I have slowly beeb picking off my tomatoes both ripe and green, before the rain soaked them well.  I realized that this year's crop was once again very good to me! 
For dinner I made a Tomato Cobbler  as I have many ripe tomatoes, so very colourful and tasty.
This dish is very filling and just adding a nice green salad makes a perfect meal.  I added some vegetable protein that I had in the fridge but you can add any choice of protein you  or your family favours (bean would work nicely too).


Tomato Cobbler
 
The Ingredients you will need.
 
 
Add melted butter to your cast iron pan

 Mince the Jalapeno Peppers

Chop your tomatoes
 
Mix your dry ingredients together, adding the wet ingredients in
and pouring into the cast iron skillet on top of the melted  butter.
 
Top with the tomato/herb mixture - add some of your favorite cheese
and bake.


  TOMATO COBBLE RECIPE
 
2 1/2 cups chopped tomatoes
1/4 jalapeno diced
3 cloves garlic, minced
1/4 cup cilantro, chopped
1/4 tsp cumin
1/2 lime - juiced
1/2 cup shredded cheese (your choice)-
I had a few slices left over from earlier in the week and used them.
1 package vegetarian sausage, crumbled (I happened to have vegie breakfast patties)
salt, pepper
Mix above ingredients and set aside.
8 Tbsp( or less) butter, melted in a cast iron skillet
In medium bowl combine:
1/2 cup flour
1/2 cup cornmeal
2 tsp baking powder
1/4 tsp salt
1 cup milk (I use 1% but whole is good)
Combine all ingredients and pour into melted butter in cast iron skillet.
Top with tomato mixture
Bake at 350 for 30 minutes - uncovered
I would serve this with either sour cream or yogurt
You  can use Italian herbs for an Italian flavour using red pepper instead.


“When you begin to touch your heart or let your heart be touched, you begin to discover that it's bottomless, that it doesn't have any resolution, that this heart is huge, vast, and limitless. You begin to discover how much warmth and gentleness is there, as well as how much space.”
Pema Chodron (born 1936);
Buddist Nun


Tuesday, September 3, 2013

MUSHROOM FALAFELS


MUSHROOM FALAFELS
 
 
Crispy on the outside, tender and juicy - perfect filling for homemade Pita Pockets.
 
Ingredients you will need.

Herbs and garlic all minced and ready.

 Mushrooms sliced and sauteed.
 
Chop the mushrooms


 Panko crumbs are added to the herb mixture.
  
All ingredients are combined in a large bowl.

Here I test to see if adding an egg is needed.  I decide
that I like the texture when 1 egg is added.

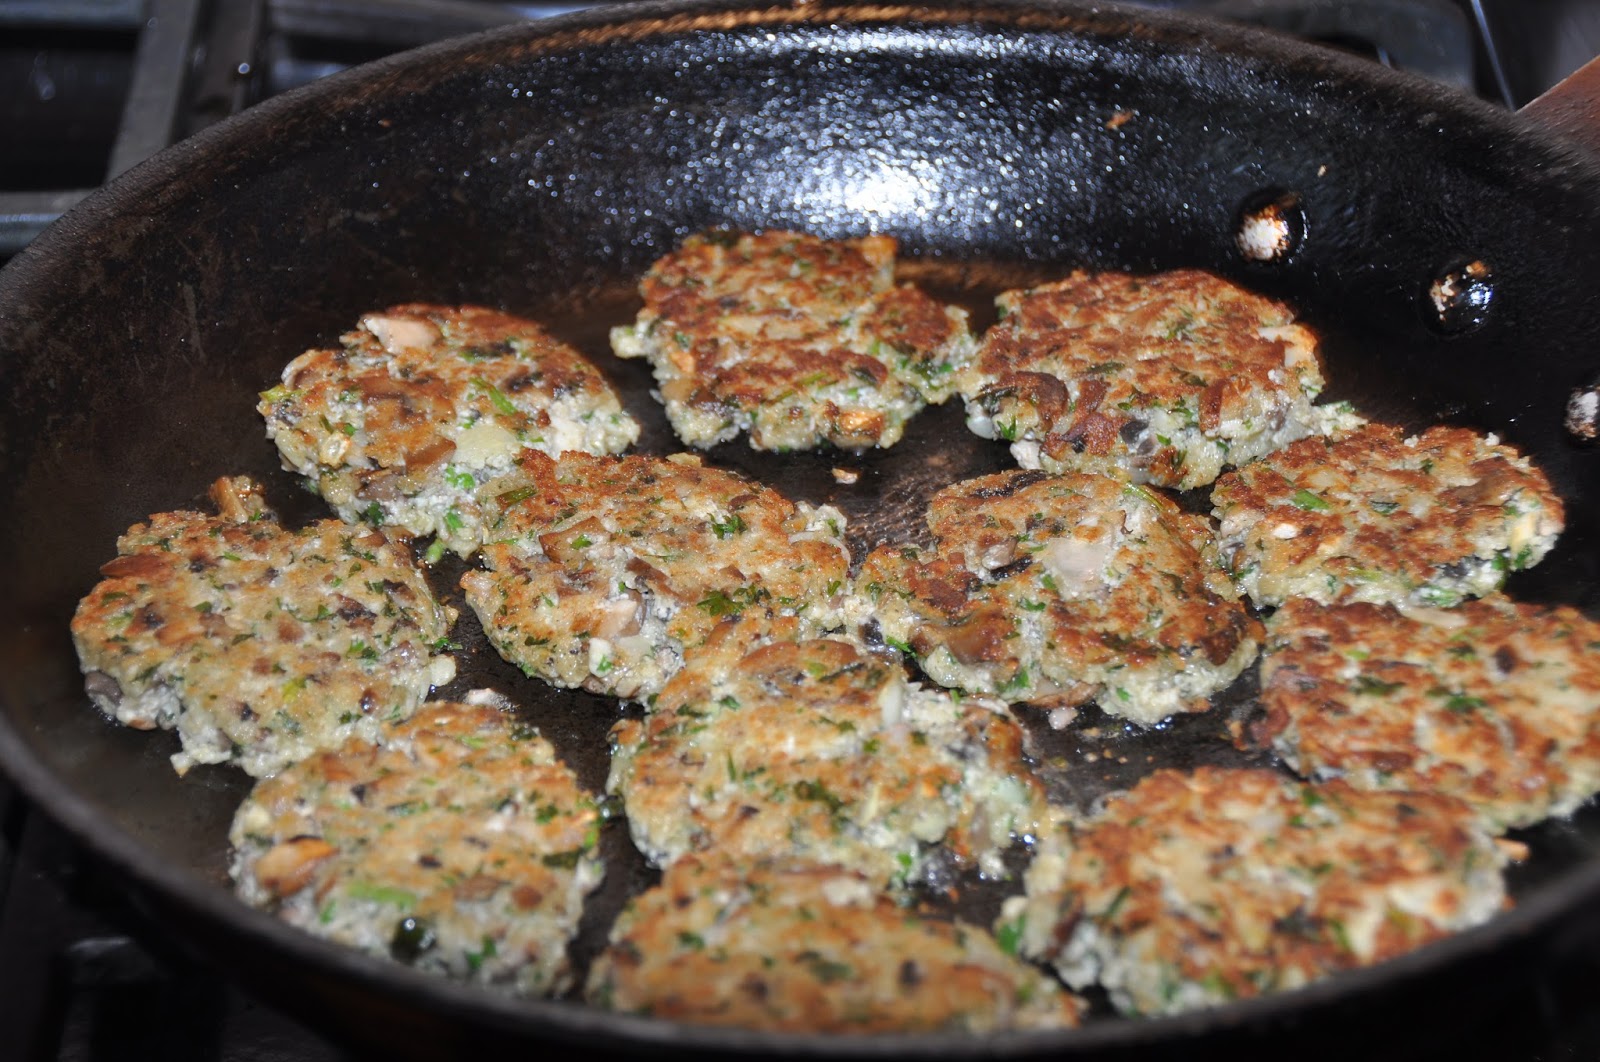
Cooking the falafels in a bit of oil, browning and crisping them up.


MUSHROOM FALAFEL RECIPE
 
Ingredients
8 oz. mushrooms, sliced
1 tbsp olive oil
1/2 cup shallot or yellow onion, very finely diced 
3 cloves garlic, very finely minced
1/2 cup cilantro or flat-leafed parsley and 1/4 cup fresh mint, finely chopped 
1 tsp. ground cumin, optional - the cumin will give it a more falafel-y flavor
1/2 cup panko bread crumbs
salt
1/2 cup whole milk ricotta
1 egg, slightly beaten (optional)
 
Directions
In a large frying pan, add enough olive oil to lightly coat the pan. Heat to medium-high, add the mushrooms and cook, stirring occasionally until the moisture they release has evaporated, about 10-12 minutes.
    Transfer the mushrooms to a cutting board and let them cool for a while. When they are cool enough to handle, chop them well.  The shallot, garlic and herbs you can definitely chop up in a food processor.)
    In a large bowl mix together the mushrooms, chopped shallot/onion, garlic, herbs and panko breadcrumbs. Season to taste with salt. Then, stir in the ricotta cheese and egg if using.
    Line a baking sheet with parchment paper or a silicone pad. Use your hands to scoop up small handfuls of the mushroom mixture and press them into little patties about 1 1/2-2 inches across.   Transfer the patties to the lined baking sheet as you make them. Then, put them in the refrigerator for an hour.   This allows them to set and firm up so they don’t just fall to pieces when you cook them.
    When ready to cook the falafel's, preheat your oven to 350F. Heat a couple of Tbs. of olive oil in a large frying pan then add as many patties as you can fit into the pan. Cook for about 3 minutes per side, until nicely browned. As they are done frying, transfer the patties to another baking sheet (or the same one). Then, put the baking sheet of mushroom-falafels into the oven and bake for 5 minutes.
    Remove from the oven and serve warm. Put a couple of patties on a pita/flatbread add your favorite veggies and dollop generously with tzatziki or as my husband likes to eat them.....with homemade salsa.

    "Words are a pretext. It is the inner bond that draws one person to another, not words."
    Rumi

Whole Wheat Sourdough Tortillas

 Whole Wheat Sourdough Tortillas


2 cups (more or less) whole wheat flour.
3 Tablespoons melted butter.
Heat it just until melted. Don’t allow it to become too hot.
1 tsp. sea salt
1/2 cup sourdough starter. (Does not need to be at the peak of it’s activity.)
1/2 cup milk or whey (water works too, but milk/whey yields a softer end result)
 
In a medium bowl, mix together the sourdough starter, milk, salt, and melted butter.
Slowly add the flour. Depending on your flour and the moisture of your sourdough starter, you may need more or less than the two cups. Adding too much flour will result in a dry, crumbly tortilla. Not enough flour with yield a tortilla that is impossible to roll out. Find your happy medium. Use your hands to mix the dough so you can get a feel of where you are at.
Once your dough is slightly sticky, but no longer a wet mess, turn it out on a floured countertop and knead for 2-3 minutes. You don’t need to knead it as long as bread dough, you are just looking to develop enough elasticity to successfully roll it out later.
Allow to sour at room temperature for 8-10 hours or overnight.
Preheat a skillet to medium-high heat. Divide the dough into 6-8 pieces, depending on your size preferences. If the dough is hard to handle at this point, you can either coat your countertop and hands with oil or knead a little unbleached, white flour into the dough.
Roll into a thin circle and carefully transfer to the skillet.
Cook for 15-40 seconds on each side. You’ll know it’s ready to flip when bubbles appear and the edges of the tortillas look “firm”.
Transfer to a plastic bag for storage in the fridge or freezer.
These are best if eaten or frozen within a day or two. If you keep them around much longer than that, they really dry out. To reheat, place them in a warm skillet for 10-20 seconds on each side. Microwaving usually equals a rubbery tortilla, so I steer away from that.

Vinegrette 'Beet Salad' ...the way my Mother/Grandmother made it

Beets, such deep red colour and so good for  you......it's that time in the garden when the beets are full and plump, ready to be harvested and cooked into many delicious and nutritious meals.  They can be boiled, roasted or grated and eaten raw in a salad.  Blood builders 'as my Mother used to tell us' while we were growing - of course as children 'beets' were not the best vegetable in our minds, we used to take them from our plates and 'colour our lips', prolonging the moment before we actually had to chew and swallow.  As an adult I have come to love beets as have my young adult children.  
My Mother made a salad that is called   'VINEGRETTE'  phonetically translated from the Russian language in English I would call it 'Beet Salad' but it is more that just a salad, it is a full meal deal.  Beets combined with cooked Romano/Italian beans, celery, onion, carrots, sauerkraut and more, to spice it up we mixed in fresh homemade horseradish that my Father would make  with horseradish dug from his garden.  What a kick it would give to this sweet and tangy salad, dressed with some oil, salt and pepper (oh, and a little pickle/sauerkraut juice).  This is a great salad to take along on a picnic or for travelling when you need a healthy filling snack.

VINEGRETTE


The ingredients you will need.

 Everything diced, sliced and ready to be mixed,  oil,
salt and pepper added and of course the pickle/sauerkraut juice.
Horseradish is added in each individual bowl to taste.


So pretty, like jewels ready to be worn.
 All that is needed is a slice of homemade bread.
 
 
VINEGRETTE  'Beet Salad' Recipe
 
4 cups cooked beets, diced
1/4 cup onion, chopped fine
1/2 cup pickles, chopped fine
1/2 cup sauerkraut, chopped fine
1/2 cup (1 apple) diced
1/2 cup carrot, diced fine
1 can Romano/Italian beans ( or any bean you like)
salt, pepper to taste
 Olive oil (or your favorite oil)
Horseradish grated (optional)
 
 Prepare beets, cook until tender.  Remove skins and dice.
Combine the rest of the ingredients in a large bowl, dress with oil, salt and pepper.
 Serve chilled.    Horseradish can be added to each individual serving as per taste.
Enjoy!
 
"It is not a question of whether you "have what it takes," but of whether you take the gifts you have -- they are plenteous -- and share them with all the world."Neale Donald Walsch


Monday, August 26, 2013

Canning Tomatoes

It's the end of August and the gardens are starting to slow down their production of fruits and vegetables.  Tomatoes are ripening on the vine and are ready for canning.  Today I started washing my jars and prepping the tomatoes ( 140 pounds) for canning.   Whenever we canned tomatoes, Mom always made her Tomato Soup from the peels, cores and juices that are collected in the process.

Growing up we always helped with the vegetables and fruits when it was time to 'put them away for winter'.  We learned while helping how to blanche, peel and stuff the jars.  To this day I have always canned a batch of tomatoes in whatever city we lived at the time.  This was one thing I loved to have in my pantry to use in soups, sauces and especially for making borscht.   As a child it was always a 'chore' - as an adult it is almost therapeutic and takes me back home to the memories of my childhood.

In this post I will show you how my Mother and Grandmother canned tomatoes.   

 
 CANNING TOMATOES
 
Tomatoes washed and blanched for 3-4 minutes

Canning jars sterilized and ready for the tomatoes.

The core is removed

The tomato skin is slipped off
  
 Cut the cored and skinned tomato into quarters and if
the tomato is large, cut into smaller pieces.
 
With your hand press the tomatoes down into the jar,
this is to ensure the jar is full of tomatoes
 
Set jar aside and continue to core, peel and fill all your jars

 The skins and cores and juices will be used later for
a 'tomato soup stock'.


 Once  you have filled all your jars and used all your tomatoes,
add 1 tsp of coarse salt to a quart jar

 Sterilize  your canning lids in boiling water and then
wipe the rims of the jars with a clean cloth, top with the
sterilized seals and finish with the jar rings.  Tighten
the rings well and place in canner.

 Add cold water to canner making sure it reached to
the neck of the jar just under the ring.

Turn on to high heat and bring to a boil,
once boiled turn heat down to a good simmer and set
timer for 20 minutes.  Turn off the heat and remove jars
to a rug or blanket and cover.  Let cool before
putting away on shelves.
 
 Beautiful, colourful, healthy tomatoes - these will be
so tasty in my soups, salads, sauces and chilies.
 
 
 YOU WILL NEED
 
Canning tomatoes
Coarse Pickling Salt
Canning jars
Sealing lids
Rings for jars
Canner or a pot to process the tomatoes.
 
 
'A friend is one who overlooks your broken fence and admires the flowers in your garden.'
Author Unknown


Wednesday, August 7, 2013

ZUCCHINI 'MEATBALLS'

Fresh vegetables from your own garden, could there be anything sweeter?  Zucchini is growing exceptionally well in my garden this year - very happy about this as I have not been able to grow zucchini until the last few years but have a neighbor who grows them very well and likes to share. (and I am very thankkful)  Zucchini can be used in sweet and savoury dishes, today I made 'Zucchini Meatballs', served with a homemade tomato sauce and some Laphsa (traditional egg noodles ) that I made many months ago.

Zucchini  'meatballs'

The ingredients you will need.

The zucchini has been diced finely and sauteed for 10 minutes in oil.

The zucchini balls shaped and ready for baking.

Here they are fresh out of the oven and ready for a sauce,
dip - great for dinner or as an appetizer for special occasions.


Zucchini (meatballs) Recipe
These vegetarian ''meatballs'' are inspired by a wonderful recipe from Italian food writer Ursula Ferrigno.
 You can easily double the quantities.
Freezer-friendly: freeze the uncooked 'meatballs'. Defrost before baking.
For grown-ups and older children: try adding a few toasted nuts to the mix.
Ingredients
2 tbsp canola or olive oil
2 cups zucchini, finely diced
1/8 cup chives, chopped
1 egg, lightly beaten
2 generous tbsp grated Parmesan, pecorino or other well-flavoured hard cheese
1 container bocconcini, chopped
1/4 cup +- breadcrumbs
1 tbsp chopped parsley
2 garlic cloves, finely chopped
freshly ground black pepper and sea salt (optional)
zest of 1/2 lemon (optional)
Method
Preheat the oven to 375-400. Oil a baking tray or line with a non-stick silicone liner.
Heat the oil in a large frying pan over a medium-high heat and fry the zucchini for about 10 minutes, until tender and golden. Set aside to cool a little, then combine them with all the other ingredients to make a thick, sticky mixture. Season if you like (remember that the cheeses already contain salt).
Take walnut-sized blobs of the mixture and roll into balls. Place on the baking sheet and bake for about 15 minutes, until golden.
Serve hot, warm or cold, on their own or with pita bread and a tomato salad or sauce.
Makes about 12.
We can create peace in the small and large
moments, by each us living it in our words
and actions~
♥
...
~shirl wisse ~


Thursday, July 25, 2013

Flower Cheese Bread

Bread and cheese a  perfect combination and once you go to the next step of stuffing cheese filling into dough and bake it - heaven.  I came across this recipe a many weeks ago and have been wanting to try it. This recipe comes from Eastern Europe, my ancentors may have made this too.  We have had  a very sunny and hot July so turning on the oven just seemed a bit too much, but this recipe called to me so I decided to bake it today.  This reminds me of a cheese pyroh or even a bit like Khachapurri.  The dough is a bit more 'pastry like' tender and buttery raised on yeast  with egg and butter ....sounding good?  Very simple to put together, with feta cheese and ricotta as the filling.  I will be serving it with borscht which I will be making tomorrow, but first a sample while it's still warm......yum.

 FLOWER CHEESE BREAD


The ingredients you will need for the dough.

The ingredients you will need for the filling.
 
  The butter has been melted and whisked with the egg.

The flour and salt combined and waiting for the rest of the ingredients.

The yeast has proofed and is ready to be added to the flour and the butter/egg mixture.

The dough shaped and filled with the cheese filling.

The Flower Cheese Bread has been  brushed with an egg wash.

 
 Onto one of the breads I added  Raspberry Jam.
 

Beautifully browned and ready to sample...
 
Such a pretty looking  bread......yes, like a  flower.
 
    FLOWER CHEESE BREAD RECIPE
Ingredients
Dough:
    2 cups Flour, all purpose
    ½ cup Butter, melted
    1 tbsp Sugar
    ½ tsp Salt
    1 Egg
    1 tsp Yeast
    ⅔ cup Water, lukewarm
    Filling:
    1 cup Feta Cheese, shredded
    1 cup Ricotta Cheese
    Other:
    4 tbsp Jam
    1 Egg, for brushing
Preparation Instructions
Start with activating your yeast, combine it with water and sugar
and let sit for 5-10 minutes until becomes frothy.
In a different bowl, melt the butter and  add the egg and mix.
In the bowl of your mixer add the flour and salt and mix well.
Pour the yeast and butter mixtures over the flour
  and mix it vigorously with the hook attachment of your mixer.
Knead the dough into a ball, rub some oil on it
  and let it rest for a couple of hours or until it doubles in size.
Get the filling ready by mixin g the feta cheese and ricotta together.
Divide your dough into 4 pieces. Roll out each piece so that it’s about 4 inches (10cm) in diameter. Add a quarter of the cheese filling in the middle of the rolled out dough. Fold it to completely cover up the cheese.
Flatten out the ball, so that it’s about 4 inches (10cm) in diameter again, and using a sharp knife cut 4 slits into it, leaving about an inch in the middle uncut. Now inside each quarter, cut 2 more slits.
Preheat oven to 375° F / 190° C.
Place the flowers carefully on a cookie sheet lined with parchment paper or a silicone baking mat and let them rise for another 30 minutes. Brush them with egg wash and add some blueberry jam on the center of the pie, if you want.
Bake for about 45 minutes, or until golden brown.
Enjoy!
 
 
'Live life one day at a time and share it with people who matter most to you.
 For life is a little jar of memories so we must fill it with people worth remembering!'